Author Topic: Greg's Bandit 400 Fuel Injection Project...  (Read 131564 times)

Offline greg737

  • Board Homesteader!
  • ***
  • Posts: 315
Re: Greg's Bandit 400 Fuel Injection Project...
« Reply #90 on: June 04, 2014, 08:44:09 PM »
It's okay...

I gave the color issue a fair amount of thought during this past winter and finally decided that a Silver Bandit 400 (front fender, fuel tank, side covers and tail fairings) with a black frame, swingarm, fork legs and headlight bucket was right for me. 

I've also got a set of high-quality vinyl decals done in Black, so the tank will have "SUZUKI" on it in black and the tail fairing will have "Bandit" in black.

I was heavily influenced by the look of the Silver SV 650 that Suzuki produced in 2003.  They (Suzuki) used a Silver that they called "Metallic Sonic Silver" which is the color I'm going to use on my Bandit.

Google-search "2003 SV650 Silver" and have a look. 

However... if you simply don't like any bike done in silver paint, we'll just have to agree to disagree. 

I'll admit that I have my own motorcycle color prejudices: I'm completely over RED, never liked any shade of BLUE, I think that a completely BLACK bike is boring, YELLOW doesn't do it for me, GREEN is for Kawasaki, pearlescent colors are for Hayabusas with stretched swingarms, "candy" colors are for Harley Davidsons... and the list goes on.


Offline andrewsw

  • Board Homesteader!
  • ***
  • Posts: 598
Re: Greg's Bandit 400 Fuel Injection Project...
« Reply #91 on: June 04, 2014, 08:53:21 PM »
Personally, I think this is one of the prettiest color combinations I've seen

http://www.returnofthecaferacers.com/2012/05/hinckley-triumph-milonga-by-cafe-twin.html

Although I think I'd have extended the cream to the frame as well. Hard to say.

Offline greg737

  • Board Homesteader!
  • ***
  • Posts: 315
Re: Greg's Bandit 400 Fuel Injection Project...
« Reply #92 on: June 13, 2014, 10:13:52 PM »
As the project grinds forward...

I'm working hard on placing (hiding) the components of the fuel injection system within the Bandit's frame. 

I've got to find places for:

- the Honda TRX-500 Rancher Fuel Pump,
- the Microsquirt ECU,
- the Innovate LC-2 wideband Oxygen sensor controller,
- the new, larger Fusebox (from Eastern Beaver),
- the '08 Yamaha YZF-R1 Regulator/Rectifier,
- several new electrical control relays,
- the Quadspark coil-on-plug ignition module,
- the QuadraMAP manifold absolute pressure sensor array,
- a fuel pump cut-off tip-over sensor
- and a cold start-up air valve.

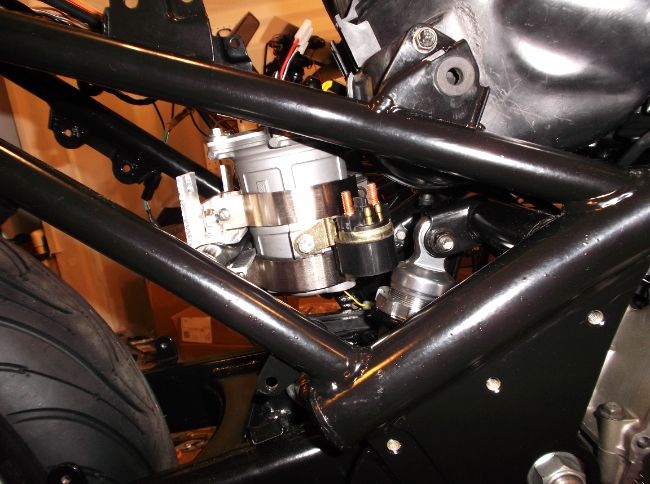
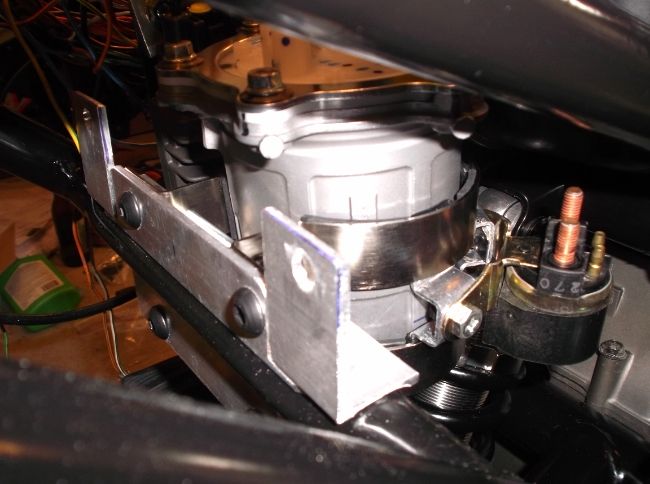
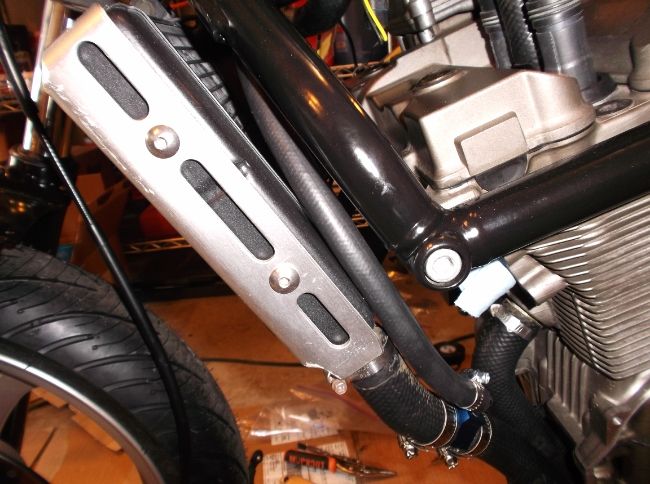
The first fuel injection system component I've placed is the Fuel Pump.  It's the biggest item of all so it needed to be dealt with right away.  The fuel pump is mounted in the space that the battery and coolant overflow bottle used to occupy.  It just barely fits between the rear end of the airbox and the frame member that used to hold the battery.
.

.
.
In this shot you can see that I've moved the Bandit's starter solenoid.  The starter solenoid is now mounted on side of the Fuel Pump (so the solenoid now sits right between the top of the rear shock mount and the rear brake reservoir).  This works well for me because the starter is only a few inches away.  The empty brackets on either end of the fuel pump bracket will hold a new mounting point for the coolant overflow bottle.
.

.
.
... another view.  You can see how close the clearance between the airbox and the fuel pump is.  Also, you can see how I mounted the '08 Yamaha YZF-R1 Regulator/Rectifier.  The Regulator/Regulator is in just about the same place as the original was in, but because the new Yamaha item is so much bigger I had to reverse the bracket that holds so that it hangs further inboard where there's more room.
.

.
.
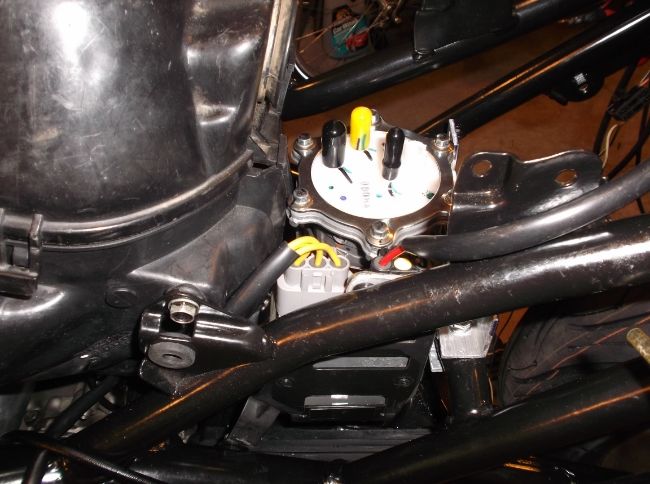
Here's a view of the Bandit's thermostat housing.  If you remember from earlier in this thread (page #2), I've modified the Bandit with a small constant-flow radiator-bypass line (like the modern bikes all have now).  In this picture you can see the radiator-bypass line leaving the bottom of the thermostat housing.
.

.
.
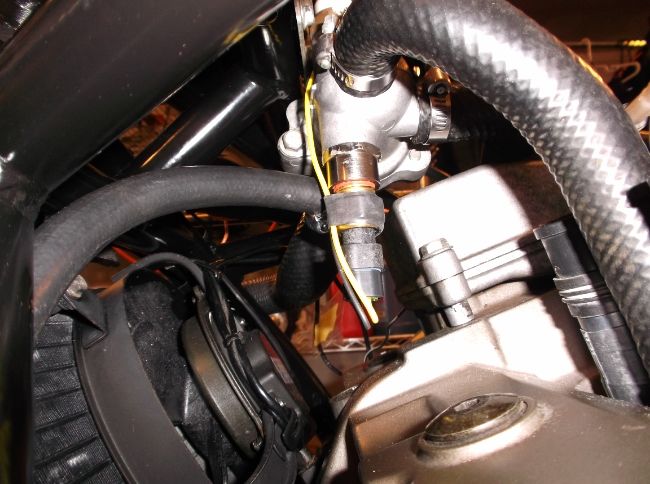
This picture shows the radiator-bypass leading down from the thermostat housing to a connection in the radiator-to-water pump hose.
.

.
.
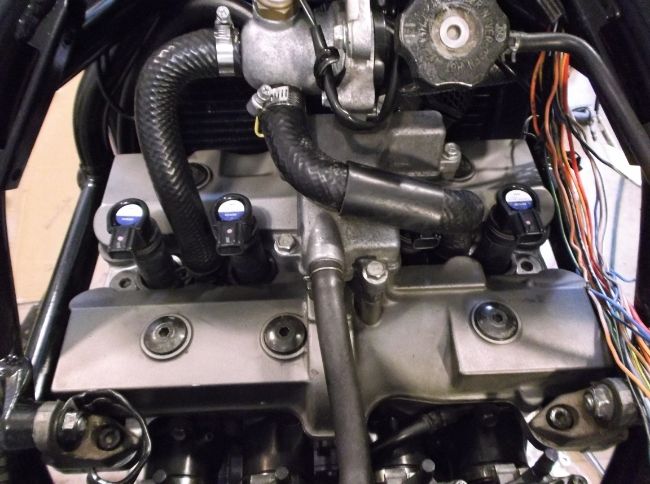
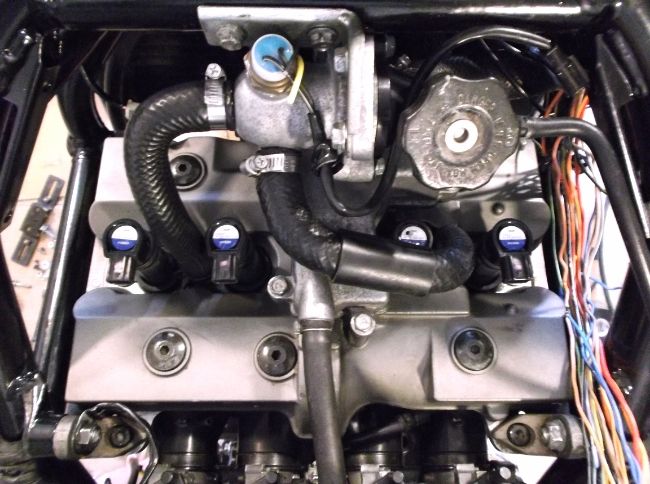
Here's a couple pictures of the '05 Honda CBR-600RR Coil-on-Plug sticks.  I took the old spark plugs out and replaced them with a fresh set of NGK CR8EKs.  Then I installed the coil sticks.  You can really see how high above the engine cover these coil sticks stand (you can also see them in the last two pictures above ^^^^).
 
These Honda coil sticks are the shortest ones I could find.  It seems that in spite of their height they're going to fit in just fine.  I've done some checking and measuring and is appears they are going to easily clear of all the other engine components, so they may be tall but they're not too tall.

.

.

.
If you look closely you can see that the coil sticks have thick, solid rubber, automotive-style tube seals on them.  When I first disassembled the Bandit I noticed that the spark plug cavities in the engine tend to hold water.  All of the old spark plugs are rusted/corroded around their tops (where the spark plug socket grabs them).  So I wanted to waterproof the new coil sticks as thoroughly as I could.  These tube seals also have the advantage of stabilizing the coil sticks, which was something I was a bit worried about because of how high they stand up above the engine cover.
« Last Edit: June 13, 2014, 10:37:52 PM by greg737 »

Offline greg737

  • Board Homesteader!
  • ***
  • Posts: 315
Re: Greg's Bandit 400 Fuel Injection Project...
« Reply #93 on: June 14, 2014, 01:41:29 AM »
Making a change up in the cockpit...

When the time comes to start riding the Bandit there will be a lot of tuning to do.  So I'm adding an Air/Fuel Ratio gauge to the instrument cluster.  The Innovate LC-2 wideband Oxygen sensor controller will continuously send information to the gauge during operation.

On my first motorcycle fuel injection project, a Kawasaki EX-250, I added a digital Air/Fuel Ratio gauge.  It's a great source of information about the bike's performance.

For the Bandit an analog Air/Fuel Ratio gauge seemed like the right way to go.

Here are a few pictures of the Bandit with the Air/Fuel Ratio gauge added to the instrument cluster.
.

.
.

.
.

.
.
« Last Edit: June 14, 2014, 01:44:31 AM by greg737 »

Offline greg737

  • Board Homesteader!
  • ***
  • Posts: 315
Re: Greg's Bandit 400 Fuel Injection Project...
« Reply #94 on: June 16, 2014, 01:53:07 PM »
Here's another example of the state of general dilapidation I've been finding in my 1993 Bandit 400 project bike.

And since I'm still pretty new to the Bandit 400 I have to ask, is it normal for the plugs to be as rusted/corroded as these are?  It seems that the design of the Bandit's cylinder head traps and holds water in the spark plug wells.  Is there no provision for drainage? 

My Kawasaki EX-250 has a drain hole in the left-hand side of the cylinder head to drain any water from the spark plug wells.

Today's example of "benign neglect" is the set of spark plugs I just removed from the engine.  You can tell just by looking that they are all well outside of the recommended 0.6 to 0.7mm gap.  In fact, of the 4 plugs only 1 had a 0.8mm gap and the rest were at least 0.85 to 0.95mm.
.

.
.
It's amazing to me that the bike started and ran as well as it did when I bought it.  This tells me that when this project is finished and my Bandit is running again I'll be treated to a vastly improved performance "feel".

Offline andrewsw

  • Board Homesteader!
  • ***
  • Posts: 598
Re: Greg's Bandit 400 Fuel Injection Project...
« Reply #95 on: June 16, 2014, 02:14:49 PM »
The stock plug wires/caps include a rubber seal that should provide some seal to keep the plugs dry, but it's only good against incidental splash. If the bike has sat in the rain (as it appears this one has) then it's easy for water to work past those and collect around the plugs.

There is a channel in the head that drains the plug well out below the exhaust ports. Probably that is clogged, as it's pretty small. This can lead to all sorts of hilarity like -- holy crap my head gasket is leaking coolant!!! The drain is just above the gasket line, so if there's water in there, and it's partially blocked, it will sputter and spit moisture as the engine warms up and boils it off.

A

Offline greg737

  • Board Homesteader!
  • ***
  • Posts: 315
Re: Greg's Bandit 400 Fuel Injection Project...
« Reply #96 on: June 16, 2014, 02:49:36 PM »
The stock plug wires/caps include a rubber seal that should provide some seal to keep the plugs dry, but it's only good against incidental splash. If the bike has sat in the rain (as it appears this one has) then it's easy for water to work past those and collect around the plugs.

There is a channel in the head that drains the plug well out below the exhaust ports. Probably that is clogged, as it's pretty small. This can lead to all sorts of hilarity like -- holy crap my head gasket is leaking coolant!!! The drain is just above the gasket line, so if there's water in there, and it's partially blocked, it will sputter and spit moisture as the engine warms up and boils it off.

A

Thanks for that information.  I'm going to have a close look at it.  I'm guessing that this passageway is clogged on my Bandit.

Offline El Gringo

  • Board Homesteader!
  • ***
  • Posts: 127
Re: Greg's Bandit 400 Fuel Injection Project...
« Reply #97 on: June 16, 2014, 03:37:40 PM »
Yep mine came out like that Greg.

Although at least all 4 of yours were the same, I had 2 cr9ek's, a cr8e and and cr10e  :yikes:

Offline greg737

  • Board Homesteader!
  • ***
  • Posts: 315
Re: Greg's Bandit 400 Fuel Injection Project...
« Reply #98 on: June 16, 2014, 09:55:31 PM »
Oh yeah, and another indication of benign neglect:

The speedometer and tachometer only had 1 working instrument light between them.  I discovered this right away on the evening back in October when I bought the bike in Portland, OR and had to ride it 425 miles to Spokane WA in the dark and cold (and some rain).

I was reminded of the old Lucas Electronics motto, "Get home before dark".

So, yesterday, after giving the 1 instrument light bulb that was still operable a proper burial (with full honors to pay tribute to the fact that it was somehow still working after 22 years of hard use), I replaced all 4 of the instrument lights with new bulbs just in case I ever want to ride the Bandit in the dark.

Offline greg737

  • Board Homesteader!
  • ***
  • Posts: 315
Re: Greg's Bandit 400 Fuel Injection Project...
« Reply #99 on: June 22, 2014, 10:51:38 AM »
So I finally got back into the garage yesterday, mainly intending to do some more work on the brackets that will be holding many of the bike's components.

The interesting discovery of the day was the spark plug drain holes.  Andrewsw was right, every one of these holes was plugged up solid, so there was absolutely no way for the spark plug wells to drain water. 

The surprising part of this mess was why and how the drain holes were plugged: 

The holes were all sealed with a cement-like substance made with light tan colored dirt.  It appears that my Bandit was left outside a lot during a portion of its life and some sort of small insect decided that the spark plug drain passages would make a nice place to raise a family.  It was probably a "mud dauber" type of wasp and that wasp found a nearby source of tan colored dirt that it really liked.  The little bug had sealed all four of the drain passages so completely and perfectly flush with the metal of the cylinder head it was hard to even find where they were located.

No wonder the old set of spark plugs looked so horribly rusted and corroded.
« Last Edit: June 22, 2014, 11:00:11 AM by greg737 »

Offline greg737

  • Board Homesteader!
  • ***
  • Posts: 315
Re: Greg's Bandit 400 Fuel Injection Project...
« Reply #100 on: July 11, 2014, 07:17:49 PM »
Well, I excavated most of the mud-dauber wasp "cement" out of the sparkplug drain holes.  Then I went back at them with some flexible pipe brushes and spray cleaner.


Offline andrewsw

  • Board Homesteader!
  • ***
  • Posts: 598
Re: Greg's Bandit 400 Fuel Injection Project...
« Reply #101 on: July 11, 2014, 07:21:54 PM »
 :thumb:

Offline greg737

  • Board Homesteader!
  • ***
  • Posts: 315
Re: Greg's Bandit 400 Fuel Injection Project...
« Reply #102 on: July 11, 2014, 08:13:24 PM »
I've been pretty quiet lately, not posting anything to this build log, but I've been working on the bike. 

The process of deciding how all of the new Fuel Injection system components will fit into the very limited space of the Bandit has taken some time to work out.  Obviously I can't hide everything up under the (yet to be built) solo seat cowl, so I've had to put a lot of thought and work into rearranging things.

Here's a pic of the Bandit as it currently stands.  I know that I already posted a similar picture a month ago but a lot of work has gone into it since then.  The brackets that are holding the various items were difficult and time consuming to get exactly right.
.

.
.
.
Here are several close-up pics that show how I've decided to locate the Fuel Pump (Honda TRX-500 Rancher 4-wheeler), the new Regulator/Rectifier (’07-’08 Yamaha YZF-R1), the Coolant Overflow Bottle and the Starter Solenoid.
.

.
.
.
In this picture you can see the new mounting position for the Coolant Overflow Bottle.  You can also see that I've reduced the length of the Bottle's neck by about an inch.  This had to be done for clearance between the seat-bracket (above it) and the arc of the rear tire travel (below and behind it).
.

.
.
.
I know it looks like there's a good bit of room between the rear tire/suspension and the Coolant Bottle but I'm going to be re-installing the rear wheel hugger so there's actually much less space than there seems to be...
.

.
.
.
Here's a couple pictures of the Coolant Overflow Bottle modification.  I wanted to keep the original snap-on cap so I cut the bottle's neck in two places and removed a middle piece that was about 1 inch long.  Then I used some water-activated epoxy tape to re-attach the top piece.
.

.

.

.
.
.
Here's an overhead picture, looking down on the seat bracket and the rear end of the airbox.  On the left-hand side you can see the wiring plugs for the Yamaha YZF-R1 Regulator/Rectifier.  In the middle you can see just how close the fuel pump comes to the rear end of the airbox, clearance is just a millimeter or two.  And at the right-hand side of the picture is the OEM Bandit starter soleniod, mounted to the side of the Fuel Pump.
.

.
.
.
Here's a picture taken from the left-hand side of the Bandit.  This shows how I had to modify the Bandit's original Regulator/Rectifier mounting bracket.  The Bandit's OEM R/R unit is much smaller than the Yamaha item which allowed it to fit into the long triangular opening of the frame.  The Yamaha R/R was too big to mount in the same space so I had to reverse the mounting bracket to locate it inboard of the frame.  There was just enough room next to the fuel pump.
.

.

Offline El Gringo

  • Board Homesteader!
  • ***
  • Posts: 127
Re: Greg's Bandit 400 Fuel Injection Project...
« Reply #103 on: July 12, 2014, 07:16:11 AM »
 :thumb:

Nicely packaged Greg, its a pain to find enough space on a bandit 4

Offline greg737

  • Board Homesteader!
  • ***
  • Posts: 315
Re: Greg's Bandit 400 Fuel Injection Project...
« Reply #104 on: August 19, 2014, 05:43:05 PM »
After more than a month I've finally made it back into the garage to get some work done on the Bandit project...

It was time to do some paint work so I built myself a do-it-yourself paint booth in the garage...
.

.
.

.
.

.
.

.
.

.
.

.
.