Author Topic: Greg's Bandit 400 Fuel Injection Project...  (Read 131213 times)

Offline greg737

  • Board Homesteader!
  • ***
  • Posts: 315
Re: Greg's Bandit 400 Fuel Injection Project...
« Reply #60 on: March 25, 2014, 01:00:40 AM »
Back in the garage for a few hours today. 

In November when I was disassembling the Bandit I discovered that the headlight bucket was a horribly rusted mess.  I had two choices: 1. get it re-chromed or 2. paint it in some other color.  This got me started looking at other people's Bandits and lots of other motorcycles in general, trying to decide on an overall color scheme for my project. 

That's when I noticed that the headlight bucket is the only chromed piece on the entire bike, that is, if you don't count the handlebars (and I don't because I'm replacing those with handlebars that are not chromed).  After I noticed this situation I couldn't stop noticing it and realized that I really didn't like it. 

One thing leads to another and when I made the decision to powder-coat the frame and swingarm in black it seemed like a good idea to do the headlight bucket as well.  Then I did a Photoshop mockup of my paint scheme and felt that the color of the front fork legs should also match the frame and swingarm.

So, here's the result of that thought process...

Offline Squishy

  • Board Homesteader!
  • ***
  • Posts: 417
Re: Greg's Bandit 400 Fuel Injection Project...
« Reply #61 on: March 27, 2014, 08:10:14 PM »
On my GSF400 the upper part of the front fork is also chrome, as well as the gauges,

Offline greg737

  • Board Homesteader!
  • ***
  • Posts: 315
Re: Greg's Bandit 400 Fuel Injection Project...
« Reply #62 on: March 28, 2014, 02:33:47 AM »
Yeah, that's right.  I guess my brain just automatically accepts that the sliding-surface portion of the forks will be chrome in color so I hardly notice them, because they're always that color on older bikes (and, yes, I know they're not always chrome colored on the newer bikes). 

Offline greg737

  • Board Homesteader!
  • ***
  • Posts: 315
Re: Greg's Bandit 400 Fuel Injection Project...
« Reply #63 on: March 31, 2014, 12:47:03 PM »
As I've mentioned already in this thread I don't know much about the history of my Bandit project bike.  But if the milage shown on the odometer is correct the bike must have spent a lot of its 22 years just sitting somewhere.  Recently I disassembled the front suspension and I think I've found evidence that my Bandit did indeed sit around a lot (possibly outside) during its life.  Whether this was one single extended period of time I can't guess but here's what I've discovered...

Let's start by looking at the fork weather seals.  They looked pretty old and dry when I first saw the bike but I really couldn't tell if they'd already failed (if they were actually letting in water and dirt) from just an outside view, but they sure didn't look good...

.
But when I got them off of the forks it was obvious that they were crap.  Here's a view of the bottom of the seals...

.
.
Obviously both of them had been allowed to go well past the point where they should have been replaced.

.

.
.
Further evidence that a good bit of water had gotten past these failed weather seals wasn't hard to find.  Here are the fork's oil seal retaining clips which sit just beneath the fork seals.  I don't know how well the picture shows it but they are pretty rusted.

.
.
But here's the real evidence.  When I got the forks completely disassembled I saw an odd-looking area of discoloration on the bottom of the chromed sliding surface.

.
.
The interesting thing to note is that the top of the line of discoloration is angled slightly.  After a few minutes I realized that the angle of the discoloration matched the fork rake angle.  This meant that whatever had caused the discoloration was liquid and that it was mildly corrosive and that this liquid was heavier than the fork oil (because it obviously went to the bottom of the fork).  Of course, water meets all of these requirements.

.
.
If you look closely at the discolored area on each fork leg you'll see that there are at least two very distinct areas (lines) on them.  This means that there were at least two (pretty long) periods of time during which the water level in the fork legs didn't change at all.  So these lines might indicate long periods of time when the bike might have been ridden very little or even stored away completely.
« Last Edit: March 31, 2014, 01:33:24 PM by greg737 »

Offline andrewsw

  • Board Homesteader!
  • ***
  • Posts: 598
Re: Greg's Bandit 400 Fuel Injection Project...
« Reply #64 on: March 31, 2014, 01:11:50 PM »
Wow! That's pretty interesting to see. Makes me worry about my squishy forks...

A

Offline greg737

  • Board Homesteader!
  • ***
  • Posts: 315
Re: Greg's Bandit 400 Fuel Injection Project...
« Reply #65 on: March 31, 2014, 01:21:28 PM »
I had three reasons to completely disassemble the Bandit's forks. 

The first reason was to replace the weather seals and the fork oil, which is simply giving the bike some of the regular maintenance that it obviously hadn't been getting during at least the last few years of its life. 

The second reason to disassemble the forks, closely related to the first reason, was to diagnose the level of wear on the fork's low-friction inserts.  I found that both sets of low-friction inserts were heavily worn.  The top set was very eroded, probably by the grit and dust that was allow in by the failed weather seals.  And the wear that the bottom set of low-friction inserts had suffered was almost certainly due to the water that had pooled in the bottom of the forks which would wash the oil off of the low-friction inserts and the inner walls of the fork legs, increasing the friction during fork motion.

The third reason to disassemble the forks was that I wanted to find out if they had been modified at all.  In the end it turned out that they were completely stock.  I've decided to modify them with Race Tech Gold Valve Emulators.

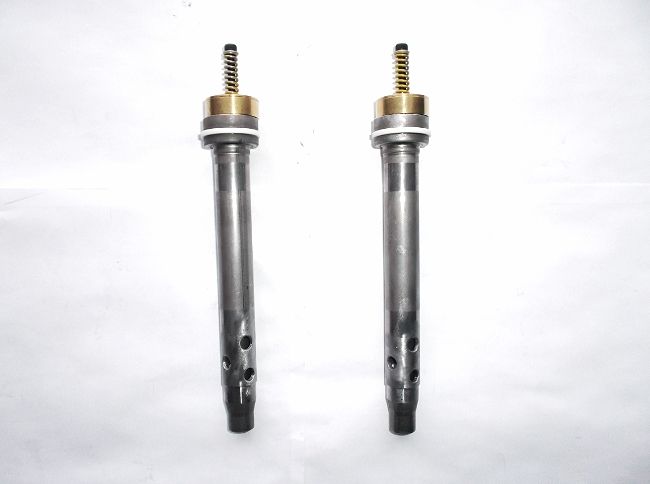
Here are the damper rods.  I didn't take pictures of them before I began the Race Tech modification.  In their original configuration they only had 4 holes in each damper rod and the holes were 1/4 inch in diameter.
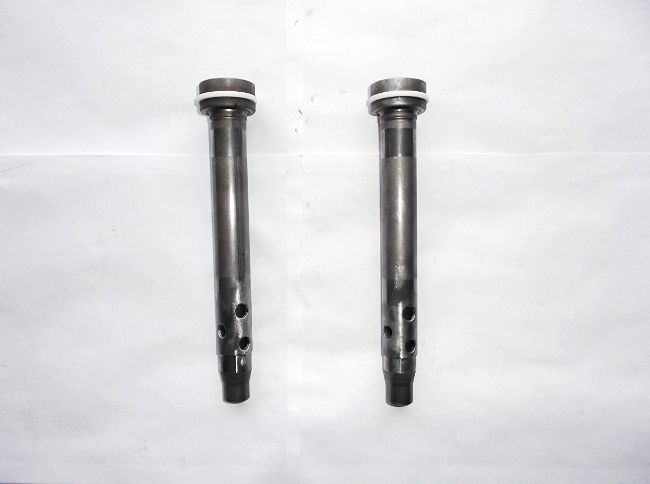
.
.
For the Race Tech modification you have to add another set of holes, for a total of 6 holes in each damper rod.  All of these holes have to be 5/16 inches in diameter.  These changes take away the damper rod's ability to affect the movement of oil through the forks.  The damper rods will be re-installed in the forks because they are a structural part of the mechanism but they no longer have a job to do.
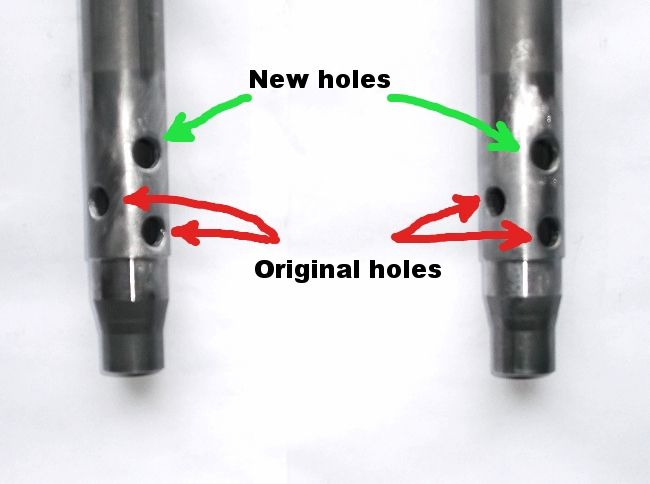
.
.
When I re-assemble the forks I'll be including the Gold Valve Emulators.  They are placed on top of the damper rods and are held in place by the fork springs.
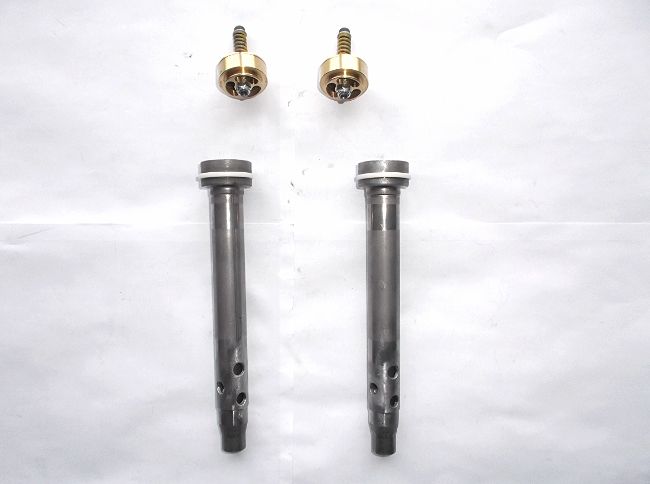
.
.
I'll be replacing the fork oil with 15 weight oil which is the correct oil for the valving in the Gold Valve Emulators.  I'm also replacing the Bandit's original springs with Race Tech springs that are straight-springrate wound for .85 kg/mm.  This springrate was determined by Race Tech's calculator which takes into account the motorcycle's weight, the rider's weight and the way the motorcycle is to be used (and I'm a relatively conservative "sport touring" guy, no track days for me... thanks).
« Last Edit: March 31, 2014, 01:36:31 PM by greg737 »

Offline greg737

  • Board Homesteader!
  • ***
  • Posts: 315
Re: Greg's Bandit 400 Fuel Injection Project...
« Reply #66 on: April 05, 2014, 05:18:15 PM »
Back in the garage this week with a good amount of time on my hands so I'm hoping to make some real progress on the project.

Today I finished up the forks.  New oil seals, dust seals, low-friction inserts, 15 weight oil, Race Tech .85kg/mm springs, Race Tech Gold Valve Emulators.  Plus the black powdercoating of the fork legs and the fork brace.

Glad that's over...

.
.
I found that I did have a picture that showed the damper rods in their original state, with only 4 holes in each one, all 1/4 inch in diameter.  This is a blow-up from a picture that showed all of the fork parts.

.
.
And here's what the damper rods look like after being modified.  Two extra holes added to each and all of the holes 5/16 inch in diameter.

Offline CrustyOreo

  • Board Regular!
  • **
  • Posts: 14
Re: Greg's Bandit 400 Fuel Injection Project...
« Reply #67 on: April 05, 2014, 08:14:24 PM »
So. Will you be selling solo cowls?  :bandit: :bandit:

Offline greg737

  • Board Homesteader!
  • ***
  • Posts: 315
Re: Greg's Bandit 400 Fuel Injection Project...
« Reply #68 on: April 08, 2014, 07:34:57 PM »
In the garage today with a long "to do" list: finishing up the Throttle Position Sensor mount, painting a few parts for the carbs, doing further modification to the plumbing of the carb's Choke mechanism, putting fork oil into the forks, removing the bearings from the wheels and, finally, getting the old tires replaced...

Took some pictures of the "before and after" from getting the tires replaced.  I ordered the tires a few months back but just got around to having them mounted.

Here are the tires that were on the bike when I bought it in October.  If these two words don't make you feel apprehensive then I'd suggest that you only ride on warm, dry days on very well-paved and clean roads.  They scare the hell out of me.

.

.
.
I mean, just look at this thing... are we on a farm or what?

.
.
Out with the old...

.
.
... and in with the new (Michelin Pilot Road 3 in the OEM size).

.

.
.
The magic word.

Offline greg737

  • Board Homesteader!
  • ***
  • Posts: 315
Re: Greg's Bandit 400 Fuel Injection Project...
« Reply #69 on: April 10, 2014, 06:33:54 PM »
This item might not seem like a big deal, but in the overall fuel injection conversion it's a real milestone.  Today I finished installing the Throttle Position Sensor (TPS) on the carbs. 

To make this happen I had to completely disassemble the number 4 carb (the furthest right-hand carb).  The pivot shaft of the number 4 carb (the part that holds the throttle plate) had to be sent out to a machine shop to have a short extension added to it.  This extension was countersunk and silver brazed to the carb's pivot shaft.  When I got it back home I had to machine the extension so it would fit into the Throttle Position Sensor.

The Throttle Position Sensor is a very important part of a fuel injection system and I was pretty nervous about getting it set up perfectly.  It will be a while before I get a chance to hook it up to the Microsquirt ECU for a power test and operational calibration, but it seems to work smoothly without any slop in the interface between the extension and the sensor.

Here's a closeup shot of the TPS install.  This is the end of the number 4 carb.

.

.
.
And here's what the carbs look like now that they're completely assembled.  Except that these aren't carbs any more... now they are fuel injection throttle bodies.

.

.
« Last Edit: April 10, 2014, 07:35:15 PM by greg737 »

Offline greg737

  • Board Homesteader!
  • ***
  • Posts: 315
Re: Greg's Bandit 400 Fuel Injection Project...
« Reply #70 on: April 11, 2014, 08:39:55 PM »
Now that the front suspension is sorted it's time to get the rear end into good shape. 

I've already pulled out the 4 original bearings from the swingarm pivots.  I replaced them with new.

I found the swingarm bearings to be dry and worn, but surprisingly the cushion lever bearings were well greased and did not appear to be worn beyond a normal amount.  So I'm not going to replace them, just clean out the old grease and re-pack them with fresh.

Once again I have to simply say that I don't know much about this bike's history.  Maybe somebody serviced the cushion lever but not the swingarm.  Who knows?

When I'm ready to reassemble the rear suspension the old KYB rear shock will not be participating.  In its place will be a nice new Hagon shock.

.
.
I struggle with the photography... just posting this picture to see which looks better on a couple of different computers/tablets.

« Last Edit: April 11, 2014, 10:27:43 PM by greg737 »

Offline El Gringo

  • Board Homesteader!
  • ***
  • Posts: 127
Re: Greg's Bandit 400 Fuel Injection Project...
« Reply #71 on: April 12, 2014, 05:20:02 AM »
Cracking updates Greg :clap:

Your attention to detail is exceptional and having the balls to modify a bank of carbs and have it look pretty much factory is nothing short of inspiring.

Should handle a helluva lot better with some decent tyres on

Offline greg737

  • Board Homesteader!
  • ***
  • Posts: 315
Re: Greg's Bandit 400 Fuel Injection Project...
« Reply #72 on: April 12, 2014, 11:54:23 AM »
Quote
Cracking updates Greg.

Your attention to detail is exceptional and having the balls to modify a bank of carbs and have it look pretty much factory is nothing short of inspiring.

Should handle a helluva lot better with some decent tyres on

Thanks man, I'm not really breaking any new ground with this project.  Other people have already done this sort of thing. 

I do have a bit of over-the-top attention to detail in my nature... it helps with things like this project and writing and building furniture and aviation, but it doesn't play too well in relationships.  The old joke goes like this: "What do pilots use for birth control?  Their personalities." 

Offline Squishy

  • Board Homesteader!
  • ***
  • Posts: 417
Re: Greg's Bandit 400 Fuel Injection Project...
« Reply #73 on: April 23, 2014, 07:04:53 AM »
New hagon shock for a GSF400..haha!
You're really going all-in.
 :bigok:

Offline tubular

  • TURBO TYPER!
  • **
  • Posts: 20
Re: Greg's Bandit 400 Fuel Injection Project...
« Reply #74 on: April 27, 2014, 08:53:31 AM »
Hello Greg,

I have one question for you regarding the fuel pump you've selected to go with. How is this supposed to be mounted? horizontally or vertically or it does not matter?

Thanks

Themis