Author Topic: Greg's Bandit 400 Fuel Injection Project...  (Read 131609 times)

Offline greg737

  • Board Homesteader!
  • ***
  • Posts: 315
Re: Greg's Bandit 400 Fuel Injection Project...
« Reply #195 on: June 23, 2015, 04:41:48 PM »
Quote
Greg have you measured (or estimated) your fuel consumption?

First, a direct, short, to-the-point answer for you NSC:  So far the overall fuel consumption (mileage, MPGs) of my Fuel Injection Project Bandit 400 seems to be about the same as a stock Bandit 400.

That's it, pretty much the same...  (short answer).

But with me there's always a long version of the answer, so if you're willing to hang in there and read some more, here's what I think I'm achieving with the fuel injection conversion:

The basic truth about any normally-aspirated, internal combustion engine is that it's nothing more than an Air Pump.  That's it, the bottom line is "how much air can this engine process?".  The basic variables in the equation are, of course, displacement and RPMs

These two items haven't changed a bit on my Fuel Injection Project Bandit 400.  In this respect it is "Bone Stock".

The value (the improvement) provided by my fuel injection conversion is very specific to the things that Squishy was talking about in his most recent post above ^^^ this one.

With the fuel injection system I can very accurately tune the Air-to-Fuel ratio across the entire operating envelope of the engine.  For example: the "likes to run rich" statement that Squishy makes is true for the Bandit 400 because it's true for every internal combustion engine.  Although, what people really mean when they say "likes to run rich" is that the Air-to-Fuel ratio at which you get "best horsepower/torque" is on the "rich" side of the Stoichiometric ratio which is 14.7 to 1 Air-to-Fuel.

If you want to make the "best horsepower" or "best torque" in a gasoline engine you have to hit a very specific Air-to-Fuel ratio. 

For "best horsepower" you want about a 12.5 to 1 Air-to-Fuel ratio.

For "best torque" you want about a 13.1 to 1 Air-to-Fuel ratio.

It's possible to achieve something close to these ratios with "seat of the pants" carb tuning, if you really know what you're doing but it's not easy or obvious.  With my fuel injection system I can absolutely verify, by way of data-logging the feedback from my Bandit's wide band oxygen sensor during test rides, that I'm achieving the proper and correct Air-to-Fuel ratios.

Offline Squishy

  • Board Homesteader!
  • ***
  • Posts: 417
Re: Greg's Bandit 400 Fuel Injection Project...
« Reply #196 on: June 23, 2015, 05:43:50 PM »
True. However there's always the choice between fuel consumption, emissions and power.
I'm not sure how your "auto-tune" is programmed, but perhaps it's a setting for "50-50" rather than full power...


Offline greg737

  • Board Homesteader!
  • ***
  • Posts: 315
Re: Greg's Bandit 400 Fuel Injection Project...
« Reply #197 on: June 23, 2015, 07:06:13 PM »
Quote
I'm not sure how your "auto-tune" is programmed, but perhaps it's a setting for "50-50" rather than full power...

What I was trying to say is that "average for a Bandit 400" fuel economy is exactly what I was expecting to get from my F.I. Bandit.

The carb Bandit 400 is tuned to make horsepower, with little concern for mileage.  And that's exactly how I'm tuning my F.I. Bandit. 

There are many small points within the Bandit's operating envelope where my F.I. system is an improvement over carbs.  But they occur in the "marginal" areas of operation, the F.I. delivers many moments of small improvement at many data-point throughout the envelope.

I still have a good bit of work to do in the process of developing a fully polished engine tune for my F.I. Bandit.

But there's no mystery or unknowns or "black magic" in this process, every single parameter over then entire operating envelope of the Bandit's engine can be examined and fine-tuned with the TunerStudio software program I'm running on my laptop.

Offline nsc

  • TURBO TYPER!
  • **
  • Posts: 34
Re: Greg's Bandit 400 Fuel Injection Project...
« Reply #198 on: June 23, 2015, 07:15:53 PM »
Greg i am always willing to read (and i already have read) all the thread 3-4 times already trying to fit the puzzle pieces in my mind.
Sorry if my questions sound noobish :roll:

having said that:
You mentioned there are specific A/F ratios for different purposes(which i know from my limited and general mechanical knowledge)
is it possible to alter A/F ratios on-the-fly with microsquirt? Something like "presets"?

Offline greg737

  • Board Homesteader!
  • ***
  • Posts: 315
Re: Greg's Bandit 400 Fuel Injection Project...
« Reply #199 on: June 23, 2015, 08:26:34 PM »
Quote
You mentioned there are specific A/F ratios for different purposes(which i know from my limited and general mechanical knowledge)
is it possible to alter A/F ratios on-the-fly with microsquirt? Something like "presets"?

Yes, the do-it-yourself fuel injection hobby is all about the ability to hit specific A/F ratios.

The TunerStudio software I'm using allows me to use a 16X16 array for basic fueling.  That's 256 data-points for Air/Fuel ratio.  These 256 points are spread across the engine's operating envelope based on Engine Vacuum (the "Y" axis of the array) and RPM (the "X" axis of the array).

But that's just the beginning of the complexity of fueling the bike. 

This basic array (called the "VE table", with "VE" meaning Volumetric Efficiency) is augmented and "trimmed" on-the-fly with addition or subtraction of fuel based on things like Coolant Temperature, Rate of Throttle Movement, Feedback from the Wide Band Oxygen Sensor, Barometric Pressure, Electrical System Voltage and more.

And on top of that I'm using the MicroSquirt's ability to implement full Ignition Control on the Bandit, by way of another array which is matched up with the VE table fueling array.  This means my Bandit now has thoroughly modern "active" control of timing advance rather than a simple, static 2-dimensional timing curve (which by definition has to be a compromise)

(an aside: you may know that some of the more advanced carb bikes of the '80s and '90s had a Throttle Position Sensor (TPS) factory installed.  This TPS was the first step toward today's modern computerized ignition control because it fed into the bike's ignition control box to augment the simple, static 2-dimensional curve with throttle Rate-of-Change information)

The ignition timing of my Bandit is now properly/precisely paired to the Air/Fuel ratio the engine is currently experiencing.  This is advantageous because lean Air/Fuel ratios burn more slowly (so you need more timing advance) and rich Air/Fuel ratios burn more quickly (so you need less timing advance).  This is especially important in situations where the rider quickly "roll on" throttle, which immediately takes the engine to a rich mixture.

The overall aim of ignition timing is to properly time the "moment of maximum cylinder pressure" so that it occurs at the point in the engine cycle (cylinder movement just past top-dead-center) where it will deliver the maximum horsepower (while avoiding "knock").
« Last Edit: June 23, 2015, 08:28:57 PM by greg737 »

Offline ventYl

  • Board Homesteader!
  • ***
  • Posts: 249
Re: Greg's Bandit 400 Fuel Injection Project...
« Reply #200 on: June 24, 2015, 09:45:47 AM »
Interesting part for me is the fuel map dimensions. 16x16 seem to be enough for Bandit RPM and load range. I wonder if 16x16 map would be fine enough to drive programmable ignitor unit or some tweaks like logarithmic coordinates has to be used due to high variability of ignition timing in low RPM range.

Not for Bandit itself but maybe one day I'll hack programmable ignitor for my other vehicle and ignition timing map size is my only concern so far.
Bandit 400 1991 - stock except of swap from GK75B to GK75A

Offline greg737

  • Board Homesteader!
  • ***
  • Posts: 315
Re: Greg's Bandit 400 Fuel Injection Project...
« Reply #201 on: June 24, 2015, 01:44:40 PM »
Quote
Interesting part for me is the fuel map dimensions. 16x16 seem to be enough for Bandit RPM and load range.

Actually, the want/need for more resolution is addressed.

The software (TunerStudio) and firmware (MSExtra) package allows for a "Table Switching" feature to be implemented.  This means if you want/need more resolution than what's offered by just a single 16X16 array you can choose to run 2 16X16 arrays.  You simply enable Table Switching in the basic parameters and then expand your "Y" axis (Intake Vacuum) out over the two separate arrays.

Implementing Table Switching gives you a little less than double the "Y" axis resolution of a single 16X16 array.

You can do this for both fueling and ignition advance.

I've never used this on either of my F.I. motorcycle projects.  I feel that they run well enough on one 16X16 table.

Offline greg737

  • Board Homesteader!
  • ***
  • Posts: 315
Re: Greg's Bandit 400 Fuel Injection Project...
« Reply #202 on: November 01, 2015, 10:57:49 PM »
Finally got back into the garage this week (my last post to this thread was way back in late June)

It was a long summer/fall that included a long vacation, life issues and work (lots of work).  These things kept me out of the garage and I just couldn't find time for motorcycles.

This week's garage time wasn't devoted to the GSF400.  Instead, the GSF400 had to sit and watch while I worked on the Kawasaki EX250 (my first fuel injection project bike).  The EX250's odometer was telling me it was time for a valve adjustment and an oil change.

It felt good to work on a motorcycle again. 

The EX250 is only a 2 cylinder motorcycle so there's just 8 valves to check and adjust.  It turned out that all of the EX250's exhaust valves were on the tight side of the specified range and half of the intake valves were on the tight side.

Got the job done and everything buttoned back up, took it for a ride, success!  The engine feels great, I think I got the adjustment just right.

Now that the EX250 is squared away I feel warmed up and ready to give the GSF400 the same treatment: It's valve adjustment time.

Doing a valve adjustment on the GSF400 is going to be interesting because this will be the first time I've opened up the engine internals. 

My GSF's engine starts well and runs well which suggests it's a healthy unit but I don't know much about the bike's history.  I know that it went through at least three owners before me.  Of those prior owners the only one I've talked to was the last in line and he didn't have the bike in his possession for very long.  So I really have no idea whether the periodic engine maintenance was performed properly and on schedule.

I'm hoping I don't find anything bad hiding under the valve cover.

Offline Gouraami

  • Board Homesteader!
  • ***
  • Posts: 147
Re: Greg's Bandit 400 Fuel Injection Project...
« Reply #203 on: November 02, 2015, 02:41:05 AM »
This is a great project!

The only issue you are going to have with the GSF's valve clearances is space, there isn't much of it. If all is currently sounding good I doubt you are going to find any surprises.

One thing you could do is measure the cam chain while you are busy, it may be worn.

Good luck  :thumb:
Project: Suzuki Bandit 400 Limited Edition, either a '90 or '91 needs a lot of TLC

Offline ventYl

  • Board Homesteader!
  • ***
  • Posts: 249
Re: Greg's Bandit 400 Fuel Injection Project...
« Reply #204 on: November 02, 2015, 05:16:39 AM »
first time i was doing that job it took me nearly 6,5 hours since removing tank til putting it back. i am not newbie to valve clearances, several of my cars do have same principle of valve clearance setting. the strip job took me that long because of several parts being removed for the first time (either by me or at all).
Bandit 400 1991 - stock except of swap from GK75B to GK75A

Offline Squishy

  • Board Homesteader!
  • ***
  • Posts: 417
Re: Greg's Bandit 400 Fuel Injection Project...
« Reply #205 on: November 02, 2015, 08:12:04 AM »
Valve clearance is pretty straight forward on the 400. The only thing I dislike is that you have to drain the coolant and remove the thermostat housing every time  :banghead:

Offline bdouvill

  • Everybody
  • Board Homesteader!
  • *
  • Posts: 78
Re: Greg's Bandit 400 Fuel Injection Project...
« Reply #206 on: November 03, 2015, 08:47:53 AM »
I 100% agree with Squishy. Valve clearance on B400 is definitely no rocket science ;-)
Benoit.
Bandit 400 1992, 1st bike.

Offline ventYl

  • Board Homesteader!
  • ***
  • Posts: 249
Re: Greg's Bandit 400 Fuel Injection Project...
« Reply #207 on: November 03, 2015, 09:10:09 AM »
5.5 hours out of 6.5 hours took me to disassemble and then re-assemble my bandit without losing anything. i actually don't remember what was the step which took me the most time. maybe draining the bike without losing coolant as I didn't have spare.
Bandit 400 1991 - stock except of swap from GK75B to GK75A

Offline greg737

  • Board Homesteader!
  • ***
  • Posts: 315
Re: Greg's Bandit 400 Fuel Injection Project...
« Reply #208 on: November 03, 2015, 04:00:52 PM »
I agree, adjusting the valves on the GSF400 is easier than my EX250.  Access to the valves is better, you can clearly see what you're doing.  I really enjoyed the process of setting the Bandit's valves.

When I started work I accidentally had the Service Manual open to the 1991-1992 model valve clearance specification, because the '91-'92 specs are printed right in Chapter 2 "Periodic Maintenance and Tune-Up Procedures".  After working on the first couple of valves I suddenly remembered that I should look in the back of the Service Manual, where the '93 "GSF400P" Service Manual Supplement is located, to find the '93 specification.

'91-'92 Spec: IN-.10mm-.15mm, EX-.15mm-.20mm
   '93    Spec: IN-.13mm-.18mm, EX-.20mm-.25mm
(quite a difference.  the '93 makes less horsepower, right?  54hp vs 59hp I think?)

The difficult part, as people have mentioned, is getting everything removed; fuel tank, coolant, radiator, cooling plumbing, thermostat housing, valve cover.  My Bandit is worse to disassemble because there's a lot of extra wiring that passes over the top of the valve cover.

While I had the valve cover off I did a few other things:

1. inspected and measured the Cam Chain (across multiple pitches of 20).  The service limit is 143mm for any 20 pitch length of it.  I came up with right at 141mm on every measurement.

2. carried out the "Cylinder Head Nuts and Exhaust Pipe Bolts" loosening and re-torquing procedure (recommend every 6000Km in Chapter 2 of the Service Manual).

3. replaced all of the old gaskets (valve cover gasket, valve cover bolt gaskets, valve cover breather o-rings and gasket) with new ones.

4. Inspected the Spark Plugs, all four plugs looked great, nothing abnormal in color or wear, no electrode erosion.

I was happy to find that everything in the valve train looks great.  Very little sign of wear, nothing abnormal.  It seems that this engine has never been allowed to run low on oil.

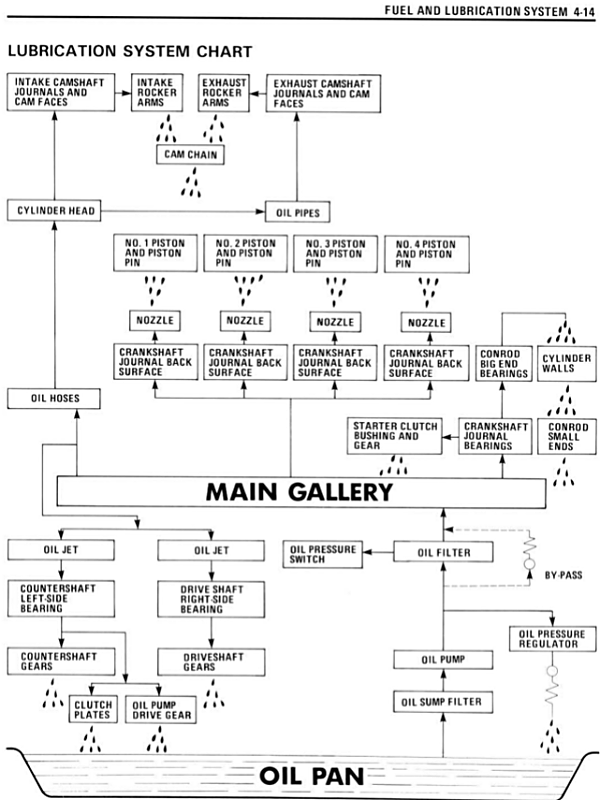
I believe a large part of the credit for this healthy engine goes to the large oil capacity of the GSF400.  3.2 liters (total capacity) for a 400cc engine?  That's a lot of oil for such a small motor.  Also, I'm very impressed with the GSF400's oil system, which is very advanced for a 1990 Sport-level motorcycle engine.

Have you ever looked at the oil delivery schematic in the Service Manual?  It's a thing of beauty!! 

(There's even an oil jet squirting onto the underside of each piston... Wow, just wow.)


I ended up spending the whole day in the garage, enjoying the work, appreciating the engineering/design of the engine.  It was dark when I finally put the bike back together.

Rode it this morning, everything's perfect.  Very Happy.
« Last Edit: November 03, 2015, 04:12:52 PM by greg737 »

Offline Squishy

  • Board Homesteader!
  • ***
  • Posts: 417
Re: Greg's Bandit 400 Fuel Injection Project...
« Reply #209 on: November 03, 2015, 04:20:41 PM »
Well done! Very satisfying when you do everything and and it works great.

Yes the 93 makes less power with different camshaft and valve clearance. But make sure you actually have a 93 model and not just a 92 model registered in 93. Mine says 92 but is actually a 91 model.

Btw you don't need to remove the radiator you can just remove the top bolt and let it hang. You then have enough room to remove the valve cover.