Author Topic: Gouraami's 400 bandit project  (Read 57499 times)

Offline Gouraami

  • Board Homesteader!
  • ***
  • Posts: 147
Re: Gouraami's 400 bandit project
« Reply #30 on: August 17, 2015, 04:50:24 AM »
Progress update:

Finally I convinced the previous owner to let me pay something for the bike. We settled on R4500 (Roughly 350(USD) at the current exchange rate) . This means that I now also have the paperwork. I must still check if it is a '90 or a '91...
I am not going to put it in my name until it will be able to pass roadworthy, in SA you only have 14 Days to get it roadworthy once in your name.

All the non set black paint has now been removed of the tank. I see there is some filler sticking through from a previous repair.


I then removed all the paint from the dent


I saw this trick on the internet, epoxying a nail on the dent and then pulling it out. I hope it works, i will find out today after work. If this works  I will hopefully be able to pull out most of the dent with a few nails. I know I will need to fill the remainder to make it smooth.


I also got a chance the balance the carbs. As I was finishing up it simply died and didn't want to start again, only swing.... then wouldn't even swing. I then accepted it stopped running due to a flat battery. I will have to see why it has stopped charging the battery, didn't have a multi meter with me yesterday.


Oil leaks that need to be sorted out:
- pissing out the breather housing on the tappet cover
- leaking on the corner of the tappet cover
- still leaking on the signal generator cover.

It looks like I will have to go to Johannesburg for two weeks due to work, so less bandit time  :banghead:


Project: Suzuki Bandit 400 Limited Edition, either a '90 or '91 needs a lot of TLC

Offline Gouraami

  • Board Homesteader!
  • ***
  • Posts: 147
Re: Gouraami's 400 bandit project
« Reply #31 on: August 21, 2015, 04:34:56 AM »
The epoxy idea simply didn't work. It would break off every time I would try and pull the dent out. I used Prattley Steel, if you wanted to try this rather buy something else. It is simply not strong enough.

Next idea was brazing. This worked, but also burned off the layer on the inside of the tank. I am not concerned as I am going to re epoxy the inside anyway. The two pictures below have some of the dent pulled out:


In the end four rods were brazed on to try and remove more of the dent. This is the final result after grinding the brazing off, I am going to have to body filler the remaining dent.


Project: Suzuki Bandit 400 Limited Edition, either a '90 or '91 needs a lot of TLC

Offline ventYl

  • Board Homesteader!
  • ***
  • Posts: 249
Re: Gouraami's 400 bandit project
« Reply #32 on: August 21, 2015, 04:38:04 AM »
looks quite good given that there's no filler yet. hope you find the effort being paid out by final result
Bandit 400 1991 - stock except of swap from GK75B to GK75A

Offline Gouraami

  • Board Homesteader!
  • ***
  • Posts: 147
Re: Gouraami's 400 bandit project
« Reply #33 on: August 21, 2015, 04:48:34 AM »
Thanks ventYl, I am really looking forward to the end result. Still many many hours to put in through.

I need to go buy some filler, plastic primer and 2k primer during lunch. Lets hope I am not too hungover to work on the bike. The friend I bought the bike from is going to France for a few months, having a going away party tonight.
Project: Suzuki Bandit 400 Limited Edition, either a '90 or '91 needs a lot of TLC

Offline Gouraami

  • Board Homesteader!
  • ***
  • Posts: 147
Re: Gouraami's 400 bandit project
« Reply #34 on: September 21, 2015, 09:35:41 AM »
Finally found some time to work on the bike again. Been away for work, etc etc.

Filled up what remained of the dent:


Sprayed some primer. I haven't sprayed anything in 15 years. If you look at the picture below you will see how badly it is sprayed! After flatting it looked better, but I will need to up my game if I want to spray the final coat. Practice makes perfect.


My filling job also needs work, you can see that I took too much off, making it look flat where it must be curved. Concentrate on the part between the two bare metal sections and the curve at the bottom.


I also redid my timing cover job. It was still leaking oil. I did what I should have done in the first place, sealant only.


Project: Suzuki Bandit 400 Limited Edition, either a '90 or '91 needs a lot of TLC

Offline Gouraami

  • Board Homesteader!
  • ***
  • Posts: 147
Re: Gouraami's 400 bandit project
« Reply #35 on: September 21, 2015, 10:28:10 AM »
The breather was the next thing on the list. This is a bit of a stupid design, the way I look at it, it has to leak if assembled as per the manual. Let me explain my view on it:

Exhibit A:


Looking at the above picture, they state to only apply thread lock to screws "2". This makes no sense, as the oil will gather in the breather and simply run past the screws (They won't seal 100% on the cover due to surface inperfections) and out onto the cover, as mine were doing. My initial improvement was wanting to place copper washers between screws 2 and the cover. This didn't work as I couldnt find 5mm copper washers.

Exhibit B:
The holes in the base are also quite large, resulting in less surface area between the cover and the screws.


I added washers and tried to fill any gaps with sealant, I hope it works. I also sealed the inner cam chain guard against the cover to prevent oil coming up from the bottom.


« Last Edit: September 28, 2015, 06:46:37 AM by Gouraami »
Project: Suzuki Bandit 400 Limited Edition, either a '90 or '91 needs a lot of TLC

Offline Gouraami

  • Board Homesteader!
  • ***
  • Posts: 147
Re: Gouraami's 400 bandit project
« Reply #36 on: September 28, 2015, 06:43:55 AM »
Update time:

Once sanded, I found a spot on the front of the tank that seemed flat once primed, some sanding revealed why. A previous repair that wasn't filled 100%



After I filled it, I primed the entire tank again. After fiddling with the spray gun settings it came out a whole lot better than the previous spray attempt. It doesn't look like I took a picture though..

I took her for a ride for the first time in a VERY long time. I struggled to get her to start initially. Turns out I mixed up the spark plug leads after I replaced the tappet cover  :duh:

The good news:
- After soaking the tappet cover gasket in silicone liquid for a few days and modifying the cover a little, the tappet cover seems to have stopped leaking.
- My sealant job on the breather cover seems to be good, no oil from there either.

The bad news:
- Whoever repaired the signal generator cover did a piss poor job:

There is a crack under that Allen cap, in the bend:
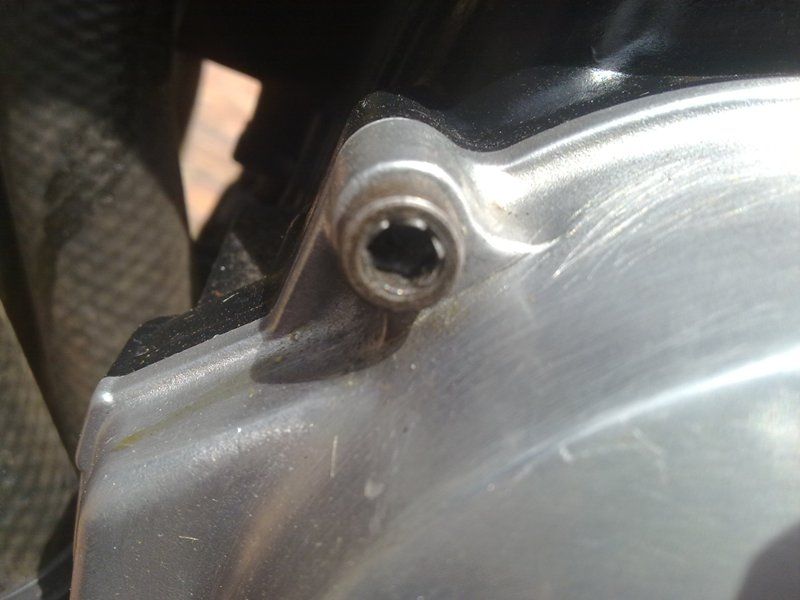

It is leaking through that weld:
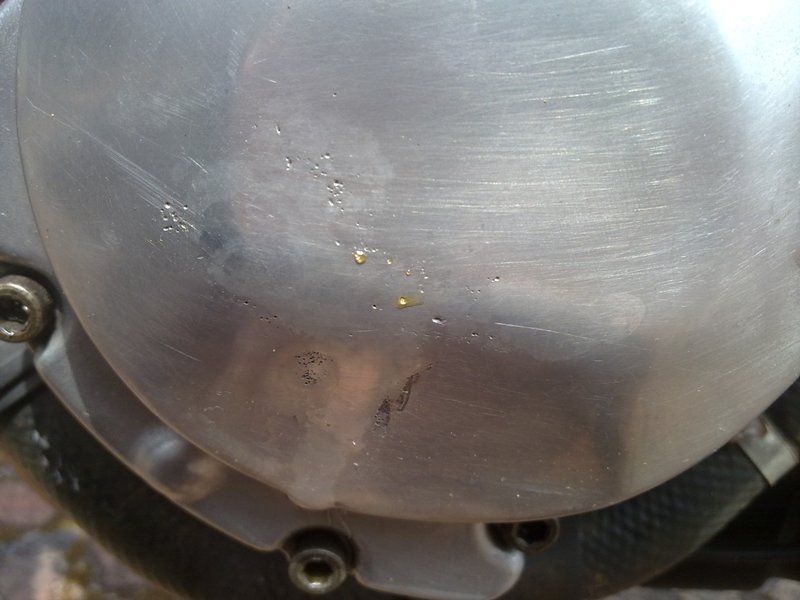

And past this one:
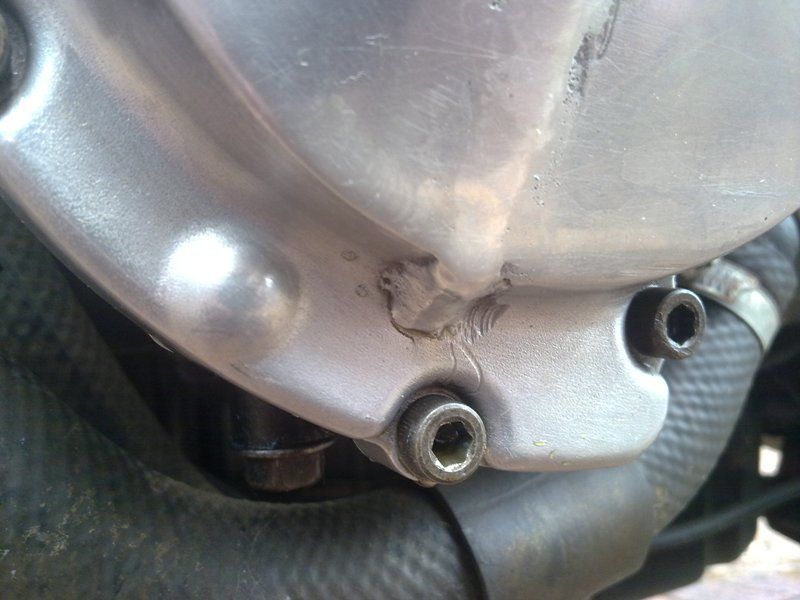

My sealant job against the block was 100% though   :grin:

During the ride I took her to 12000rpm for the first time, sitting with a heavy flat spot at +- 7000rpm. She pulls well from after the flat spot till 12k.
I am also sitting with a flat spot coming off idle. I am going to turn out the pilot screws from the stock 1.5 turns to 2 and see what happens.

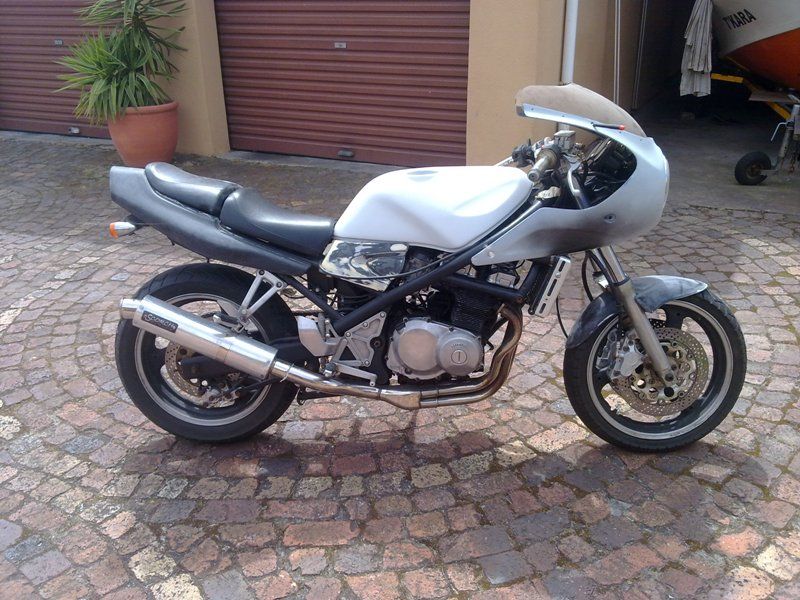
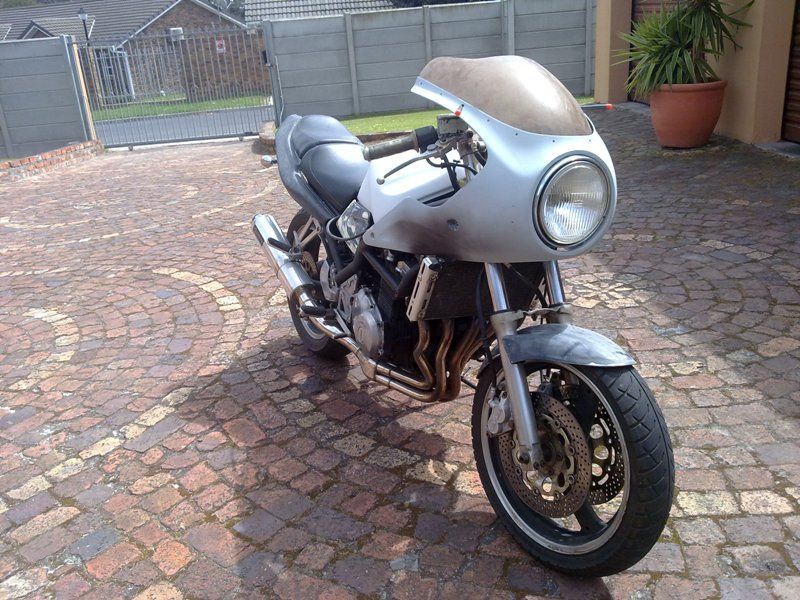
To give myself some motivation I loosely attached the panels and fairing to give me an idea of what she will look like once complete, the previous time I didn't have the headlight attached. I am  really looking forward to getting her on the road. The weather hasn't been playing along for spraying.


Project: Suzuki Bandit 400 Limited Edition, either a '90 or '91 needs a lot of TLC

Offline Gouraami

  • Board Homesteader!
  • ***
  • Posts: 147
Re: Gouraami's 400 bandit project
« Reply #37 on: October 08, 2015, 04:44:28 AM »
In the above picture you will see the fairing is already half repaired. Initially the fibre glass had broken off on both sides where the faring is secured to the frame. I didn't document it initially due to the "spray painter" wanting the parts urgently. I took some pictures last night to document the past and current repairs.

I fiberglass-ed both sides. (done a few months ago):


The two recesses on the outside of the fairing also needed to be redone. I didn't have filler at the time, but the "spray painter" offered to smooth out the holes for me if I could cut them out in the correct places. I did what he asked, but he didn't return the favour. The holes were not even round once he had filled the edges. This has led to me redoing the job this week.

I didn't take a before picture, but I used a dowel to get the recess's round:


The end result, still need to chamfer that edge. It looks a lot better than the original attempt! You should be able to see the different colour fillers when looking at the hole. I am still busy with the other side.


Project: Suzuki Bandit 400 Limited Edition, either a '90 or '91 needs a lot of TLC

Offline ventYl

  • Board Homesteader!
  • ***
  • Posts: 249
Re: Gouraami's 400 bandit project
« Reply #38 on: October 10, 2015, 04:23:02 AM »
Was the same spray painter who screwed the first paint job? Or is general reliability services in your area poor?
Bandit 400 1991 - stock except of swap from GK75B to GK75A

Offline Gouraami

  • Board Homesteader!
  • ***
  • Posts: 147
Re: Gouraami's 400 bandit project
« Reply #39 on: October 14, 2015, 03:53:48 AM »
This is still from the guy who stuffed up the first job.

Unfortunately service is generally poor.
Project: Suzuki Bandit 400 Limited Edition, either a '90 or '91 needs a lot of TLC

Offline Gouraami

  • Board Homesteader!
  • ***
  • Posts: 147
Re: Gouraami's 400 bandit project
« Reply #40 on: October 18, 2015, 09:17:40 AM »
During the week I was prepping the tank inner for epoxy, as the inside is rusted. Even though I sealed the holes I kept finding pool acid ( the sulphuric acid is used to remove all the crap on the inside) running out. After some investigation I found a drilled hole in the tank!! Out of all the odd things I have seen done on/to this bike, this surprised me the most.

What type of complete idiot drills into a tank? why?  :banghead:

I will braze it up before I coat the inside.


Then while prepping the panels for primer I came across another crack in the one side cover, not sure where this came from, maybe I broke it without realizing? Either way, fibre glass time:


It turns out that if you do not go out drinking on a Friday night you can be productive on a Saturday! Plastic primered the plastic parts and then primered everything. I actually like the grey colour of the primer...I was considering putting a clear cote over it  :shrug:

My spray painting skills are definitely improving, feeling more confident for the final coats


Project: Suzuki Bandit 400 Limited Edition, either a '90 or '91 needs a lot of TLC

Offline ventYl

  • Board Homesteader!
  • ***
  • Posts: 249
Re: Gouraami's 400 bandit project
« Reply #41 on: October 18, 2015, 12:57:54 PM »
I wonder what prevented the fuel from leaking out of fuel tank previously? :roll:

Do you have something special for the internal tank cure? I heard about some two-substance epoxy specially suited for inside of tanks. Mine is fine but... not only in south africa service reliability is poor. Someone in Germany thought it would be a good idea to spray-paint inside of tank which began rusting due to a lot of sitting time (<20000 km in 24 years means a lot of sitting). I think that the paint is being melt by fuel and that caused my problems with severely clogged carbs. Some places are already showing signs of rust doing it's job underneath the paint so I assume that I have to re-do it in less than two years. Fortunately I have spare fuel tank to ride during that time.
Bandit 400 1991 - stock except of swap from GK75B to GK75A

Offline Gouraami

  • Board Homesteader!
  • ***
  • Posts: 147
Re: Gouraami's 400 bandit project
« Reply #42 on: October 18, 2015, 01:26:57 PM »
It must have been drilled during its "restoration" over the past X amount of years, it wouldn't have been able to be used with the hole in.

Satisfactory service delivery is a global problem unfortunately.
Normal paint definitely wouldn't stand up to petrol for a long time. It is going to be best to redo yours sooner than later if you can see the blister marks from the rust.

The epoxy you describe sounds like the one I have purchased, specifically for petrol tanks. Apparently their is a 3M product as well.

This is the one I am going to use:


« Last Edit: October 18, 2015, 01:29:35 PM by Gouraami »
Project: Suzuki Bandit 400 Limited Edition, either a '90 or '91 needs a lot of TLC

Offline Gouraami

  • Board Homesteader!
  • ***
  • Posts: 147
Re: Gouraami's 400 bandit project
« Reply #43 on: October 26, 2015, 09:03:36 AM »
Update time:

Turns out the fairing needed more work than was initially thought. I found another two broken/cracked pieces. Once again, fiberglass time.


I seem to be doing things in the incorrect order. I was supposed to braze the tank and put the epoxy in the tank before spraying, but it didn't work out that way. The weather was good for spraying on Saturday, so I didn't want to miss out on the opportunity.

I sprayed the parts that were ready, it actually went better than expected! I sprayed 3 coats, but I want to do another 3. 


The next day I spotted something that looked like a dent in the tank. Unfortunately I was right  :annoy:  I seemed to have missed this while repairing the other side. It is really shallow and around 2 cm in diameter,  which is why I must have missed it while the tank was matt in colour. It is going to irritate me every time I look at the bike , so i might as well sort it out now while I am spraying. I have added pictures of the dent at different angles.


Project: Suzuki Bandit 400 Limited Edition, either a '90 or '91 needs a lot of TLC

Offline ventYl

  • Board Homesteader!
  • ***
  • Posts: 249
Re: Gouraami's 400 bandit project
« Reply #44 on: October 26, 2015, 09:40:03 AM »
Mate, I think that if you ever want to take it out to ride after it will be finished there's no worry 'bout that dent. I didn't recognized it before reading the paragraph describing it (actually I was thinking: what a good paint job). I doubt anyone will be pedantic enough to find it while looking at the bike. My old car has huge dents all over the body due to hailstones. Only few people realized that without me pointing it out. Despite the fact that dents are bending the light into 4th dimension.
Bandit 400 1991 - stock except of swap from GK75B to GK75A