Author Topic: Greg's Bandit 400 Fuel Injection Project...  (Read 132018 times)

Offline greg737

  • Board Homesteader!
  • ***
  • Posts: 315
Re: Greg's Bandit 400 Fuel Injection Project...
« Reply #75 on: April 27, 2014, 09:15:53 PM »
The Honda TRX-500 fuel pump has to be mounted vertically, or to put it another way: with all of its hose connections pointed straight upward. 

It's been a while since I took one of these TRX pumps apart (6 years ago when I put one on my EX-250 project) but if I remember correctly the intake for the pump is located at the very bottom of the aluminum housing which makes sense because it helps to avoid air bubbles and air pockets so the pump doesn't cavitate.

Also, the hose connection that is used to return the pump's excess output to the bike's fuel tank is just an opening in the plastic top of the pump housing so it depends on the pump being vertical to evacuate any air that might get into the housing.

Offline greg737

  • Board Homesteader!
  • ***
  • Posts: 315
Re: Greg's Bandit 400 Fuel Injection Project...
« Reply #76 on: May 02, 2014, 06:39:00 PM »
Finally... back in the garage after a half-month of working too hard at the "job".

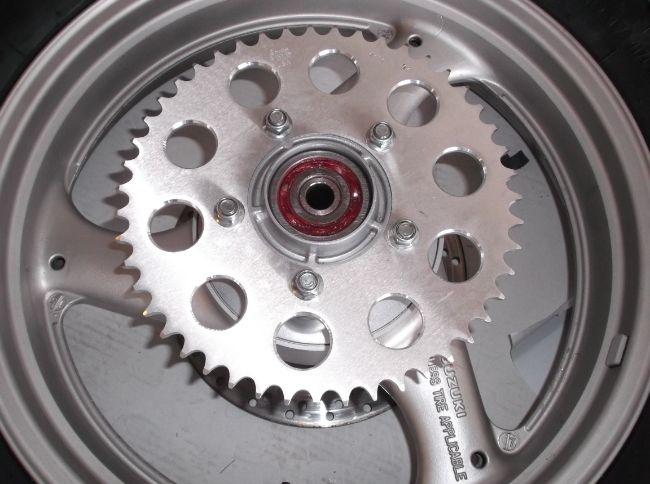
Today I pressed the new bearings into the wheels and the sprocket carrier. 

I also installed the new final drive ratio I've decided to try: 15 tooth front sprocket and 47 tooth rear sprocket.  This lowers my Bandit's final drive ratio to 3.13, just a little bit lower than the 14/46 ratio of 3.29 that it came with from the factory.  The few times I road my Bandit before I started the project work the bike felt like it would be better with just a bit lower highway RPMs.

The new sprockets I'm using are 520 chain size and I'll be using an EK x-ring 520 chain on the bike.

The last thing I did was "Shim the Cush Drive" in the bike's sprocket carrier.   This easy little modification is a must-do on my other bike, the Kawasaki EX-250. 

The EX-250's cush drive is known to be a problem item because it seems that Kawasaki used pretty cheap rubber in it.  The rubber that Kawasaki used ages pretty quickly and shrinks down in size quite a bit.  Because of this shrinkage in the interface between the EX-250's sprocket carrier and its rear wheel a lot of "lash" develops in the bike's final drive and this lash cannot be removed by anything other than shimming up the cush drive.  What makes the Kawasaki's situation even worse is the fact that if you buy "new" rubber pieces for the EX-250's cush drive they come to you already shrunken up and you still have to shim the drive to eliminate the lash.

The Bandit's cush drive definitely seems to be a higher-quality item when compared with my Kawasaki.  My Bandit is 22 years old and the rubber that Suzuki used in its cush drive looks to be in much better shape than the rubber in my 9 year old EX-250's cush drive. 

But I just couldn't bring myself to simply put it all back together without taking the time to shim it anyway because even high quality rubber ages over time and I could actually feel a bit of play in the Bandit's sprocket carrier when I checked it by hand.

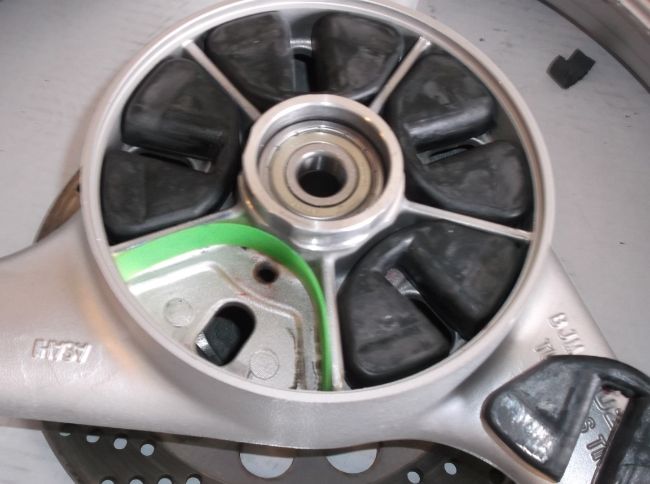
Here's the rear wheel before the new bearings were pressed in, the sprocket carrier (also just prior to installing its new bearing) with its new 47 tooth sprocket and the 5 rubber interface pieces of the cush drive.
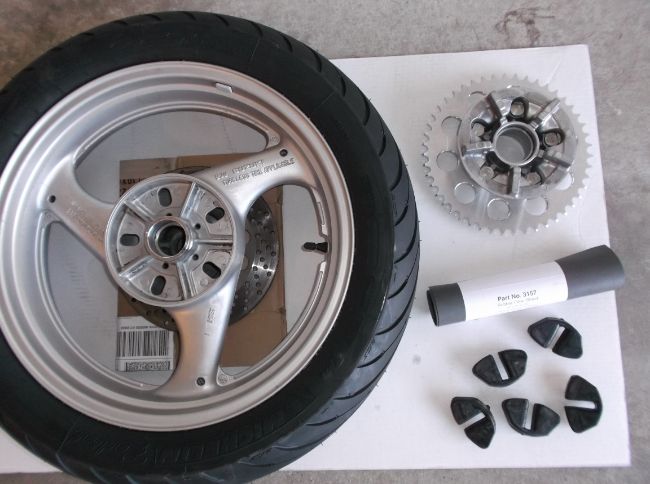
.

.
.
Here's a "before shimming" picture and you can see that the fit of the rubber pieces is still pretty good after 22 years.
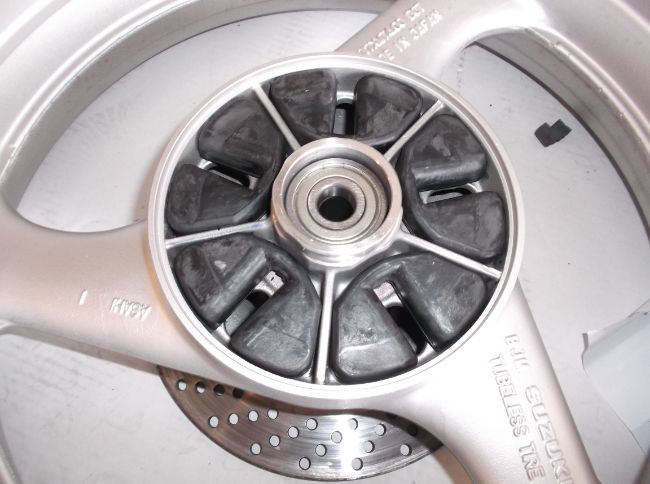
.
.
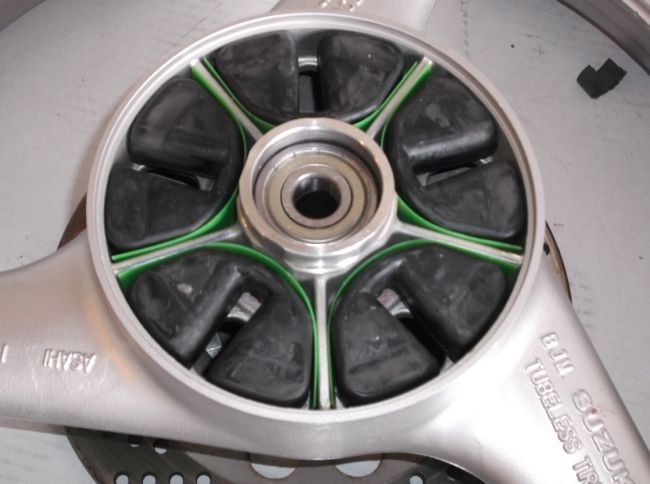
But I'm gonna shim it anyway.  I'm using plastic pieces cut from a WalMart roll-up cutting board.
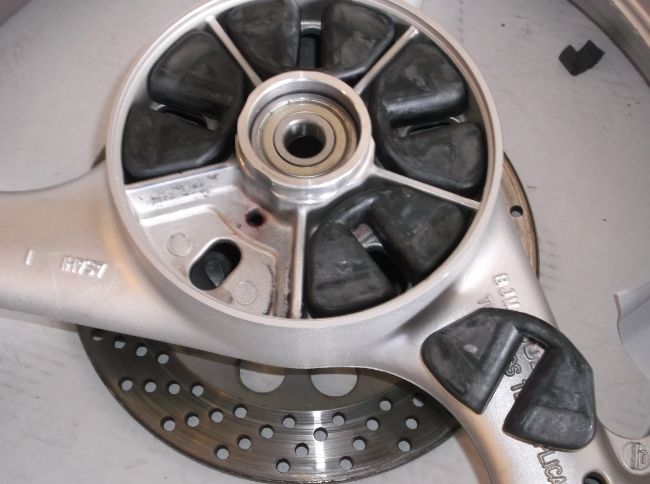
.

.

.
.
Done.
« Last Edit: May 02, 2014, 10:12:54 PM by greg737 »

Offline greg737

  • Board Homesteader!
  • ***
  • Posts: 315
Re: Greg's Bandit 400 Fuel Injection Project...
« Reply #77 on: May 07, 2014, 01:32:28 AM »
Slowly slogging toward the goal...

Here's a small piece of the overall project that is absolutely key to the fuel injection system.

This is a 1992 Bandit 400 signal generator wheel.

.
.
It needs to be modified so that it will send a signal that the Microsquirt ECU can interpret.  This will be the basis for timing both ignition and fuel injection.
.
.
The first step in the modification is to cut the long tooth off of the wheel.  This gives the signal wheel a 6-1 tooth configuration.  In the do-it-yourself Microsquirt fuel injection world this is called a "six minus one" signal wheel.

.
.
The problem with cutting a tooth off of the signal wheel is that this ruins the balance.  This wheel has to be able to rotate at nearly 14,000 rpm with perfect balance.  Removal of the tooth took 10 grams off that side of the wheel (the removed piece weighs 8 grams and the cut turned 2 grams of the metal into dust).

Now I've got to rebalance the wheel so it won't vibrate and shake.  This could possibly damage the engine, make it wear prematurely or make it vibrate so much that it totally sucks to ride the motorcycle.  An easy first step toward rebalancing it is to simply weld the removed piece back into the wheel.


.
.
The wheel started out at 815 grams before the tooth was cut off.  Now, after welding the tooth back onto the wheel, the weight is 814 grams.  That's close if we're only considering the static weight of the item, but I also have to deal with the fact that I've removed weight from the far edge of the wheel and moved it nearer to the middle of the wheel.  The dynamic, spinning nature of the item means that weight near the perimeter has a much greater effect on its balance than weight that is nearer to the center.

So I had an aerospace engineer at one of America's premier aerospace firms (my younger brother) do an analysis of the wheel for me.  A lot of nerd-math later, he told me that I needed to remove exactly 6.8 grams of metal from an area on the opposite side of the wheel with the cuts centered over a distance of 32mm from the center of the wheel's rotation.

Here's the finished product, weighing in at just a tick over 807 grams.  Now it's ready to go back into the engine.

« Last Edit: May 07, 2014, 06:18:37 PM by greg737 »

Offline greg737

  • Board Homesteader!
  • ***
  • Posts: 315
Re: Greg's Bandit 400 Fuel Injection Project...
« Reply #78 on: May 08, 2014, 12:34:17 AM »
I've finally arrived at a point where I can begin reassembling the Bandit. 

After an entire winter spent working on little bits and pieces it's really nice to see it start looking like a motorcycle again.


.
.

Offline greg737

  • Board Homesteader!
  • ***
  • Posts: 315
Re: Greg's Bandit 400 Fuel Injection Project...
« Reply #79 on: May 08, 2014, 03:20:00 AM »
Another thing I did today was remove the Choke lever and the choke cable.

This was something I enjoyed doing on my first fuel injection project bike (Kawasaki EX-250).  The Microsquirt fuel injection ECU will be taking care of cold start-up issues from now on so I can toss out the old handlebar lever and cable.

On cold start-up the Microsquirt will automatically open up the Fast Idle air valve which mimics the airflow increase the manual choke lever provided.  The ECU will also increase the fueling to an amount that is correct for the current temperature.  As the engine temperature increases during the first few minutes of operation the Microquirt slowly tapers down the amount of additional cold-start fueling.  Later in the warm-up, when the engine temperature reaches a pre-determined level, the Microsquirt will close Fast Idle air valve and continue reducing the extra fueling until the engine reaches normal operating temperature.  At that point the Microsquirt reverts to its normal fueling program.

So, goodbye to the choke lever and cable.

Offline El Gringo

  • Board Homesteader!
  • ***
  • Posts: 127
Re: Greg's Bandit 400 Fuel Injection Project...
« Reply #80 on: May 09, 2014, 11:25:07 AM »
Looks great Greg

There's something deeply satisfying about building up a bike from fresh, clean parts

Offline greg737

  • Board Homesteader!
  • ***
  • Posts: 315
Re: Greg's Bandit 400 Fuel Injection Project...
« Reply #81 on: May 24, 2014, 02:12:12 PM »
A bit of a vent here...

This Bandit 400 is my first motorcycle refurbishment project and I've discovered that the most irritating part of the whole effort is the absolutely filthy condition of it.

My project Bandit is 22 years old and every single part of this bike is covered with grease and grime.  There's no way to work on anything without having to clean/wash/degrease it first.  If I don't take the time to do this I end up covered in filth up to my elbows.

Right now the bike's entire wiring harness is lying in a bathtub with Simple Green cleaner sprayed on it.  There was no way around it, the wiring harness was a horrifying, greasy, grimy mess and had to be washed.

The "silver lining" of my little storm-cloud is that I'm finally running out of things to clean and I'm moving into the re-building phase.

Offline andrewsw

  • Board Homesteader!
  • ***
  • Posts: 598
Re: Greg's Bandit 400 Fuel Injection Project...
« Reply #82 on: May 24, 2014, 02:55:10 PM »
 :rofl:

yep. My bandit is that way too. I commute daily, in all weather. it's just filthy and there's nothing I can really do about it. I do relish the opportunity to work on it so I can clean that small bit, but it's a hopeless battle. Nothing short of weekly detailing will keep up and I just don't have the time. So... if you ever end up working on *my* bike, I apologize in advance.

A

Offline Squishy

  • Board Homesteader!
  • ***
  • Posts: 417
Re: Greg's Bandit 400 Fuel Injection Project...
« Reply #83 on: May 24, 2014, 04:46:46 PM »
Tell me about it...
Before and after
...

Offline greg737

  • Board Homesteader!
  • ***
  • Posts: 315
Re: Greg's Bandit 400 Fuel Injection Project...
« Reply #84 on: May 24, 2014, 07:11:20 PM »
Making progress...

I'm working on reassembly right now.  Just some basic stuff to start, then I'll begin making the changes necessary for the fuel injection system.

So far today I've begun to re-install the Bandit's original wiring harness.  I need to get it back in the bike so that I can begin modifying it for the fuel injection system.

The portion of the wiring harness located at the front end of the bike: the controls and headlight wiring, won't be changing so I put it back into the headlight bucket as close as possible to the way that the Bandit Service Manual shows.

Putting the wiring harness back into the headlight bucket might not sound like a big deal but everything about my project Bandit is complicated. 

At some point in the past a Prior Owner decided that instead of putting all the wiring back into the headlight bucket he would just wad the whole mess of wiring into a ball with a couple of big zip-ties and jam it between the back of the headlight bucket and the steering tube.  What a mess...

It wasn't easy but I believe that I got it all back in the bucket in the original factory configuration.  Even after being treated badly by the Prior Owner the various wiring bundles still had hints of their original bends and shapes.
.

.
.

.
.
.
It was a huge relief when the headlight went back in without a struggle.  I guess if it fits well I must have gotten it right.
.

.
.

.
.


Offline the2ndgeorge

  • New user!
  • *
  • Posts: 8
Re: Greg's Bandit 400 Fuel Injection Project...
« Reply #85 on: May 28, 2014, 08:12:13 AM »
Could u have used a wheel balancing machine to figure out the added weight needed on the signal generator wheel?

Offline greg737

  • Board Homesteader!
  • ***
  • Posts: 315
Re: Greg's Bandit 400 Fuel Injection Project...
« Reply #86 on: May 30, 2014, 03:05:35 AM »
I'm currently working on getting several of the fuel injection system components mounted on the bike and hope to have pictures of the work soon.

I was working on the bracket that will hold the fuel pump which required a lot of test fitting so I was handling the fuel pump a lot.  At one point I put the pump down on the garage floor and when I went to pick it up again it reminded me of something I see almost every day.

I think the pump with its brackets looks like my daughter's piggy bank.
.
.
.

.
.
Maybe I've been in the garage a little too long today.

Offline greg737

  • Board Homesteader!
  • ***
  • Posts: 315
Re: Greg's Bandit 400 Fuel Injection Project...
« Reply #87 on: June 02, 2014, 10:04:46 PM »
Working toward a new paint job for the Bandit.  It's going to be a "do-it-yourself" deal, done in my own garage with ColorRite products for the color (Suzuki Metallic Sonic Silver) and urethane clearcoat.

I'm trying to "do it right the first time" by researching a lot of how-to information sources and by working hard to get the preparation done correctly.

Here are all the parts to be painted.  All the original Suzuki Red paint has been removed from the surfaces that will be visible.
.

.
Paint-prep is such drudgery, but every "how-to" resource on painting motorcycles (and cars) says that prep work is the key to a getting a good result.
« Last Edit: June 02, 2014, 10:10:05 PM by greg737 »

Offline Squishy

  • Board Homesteader!
  • ***
  • Posts: 417
Re: Greg's Bandit 400 Fuel Injection Project...
« Reply #88 on: June 04, 2014, 07:30:09 PM »
Oh noes, you're spraying it silver?

Offline andrewsw

  • Board Homesteader!
  • ***
  • Posts: 598
Re: Greg's Bandit 400 Fuel Injection Project...
« Reply #89 on: June 04, 2014, 08:05:36 PM »
Don't yuck someone else's yum! :wink:

A