Author Topic: Greg's Bandit 400 Fuel Injection Project...  (Read 149580 times)

Offline greg737

  • Board Homesteader!
  • ***
  • Posts: 315
Greg's Bandit 400 Fuel Injection Project...
« on: October 25, 2013, 01:39:53 AM »
There's a long road ahead but you've got start somewhere, so here we go...

I'm starting the project here in late October and plan to have it up and running by late Springtime 2014 (if the world doesn't decide to end first).  I decided to do this project in early October when I found the bike for sale on Craigslist.  I guess the project officially began the day I bought the bike, 10 October, but since then all I've done is some thinking, planning and I've bought some parts off of Ebay and from manufacturers.

My GSF400 is a bit on the rough side cosmetically, it's a 1993 that is registered on a Salvage Title since being (gently) wrecked by either the first or second owner.  Mechanically it seems to be pretty okay, and that includes the engine.  I wonder if the bike didn't spend a lot of its 20 years just sitting in somebody's garage awaiting repairs.  The odometer shows just short of 20,000 miles (but I don't put too much faith in the odometer readings on used vehicles).

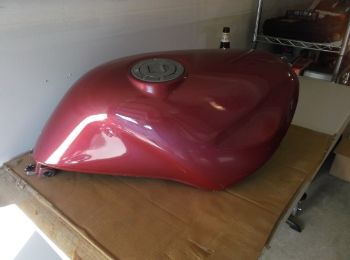
Today, 24 October, was the first day I did actual work on anything so I'm counting it as "Day 1" of my project.  And the item that kicked off the festivities was the arrival of a fuel tank I purchased off of Ebay.

Anybody recognize it? (I know the Bandit 400 community is pretty small)
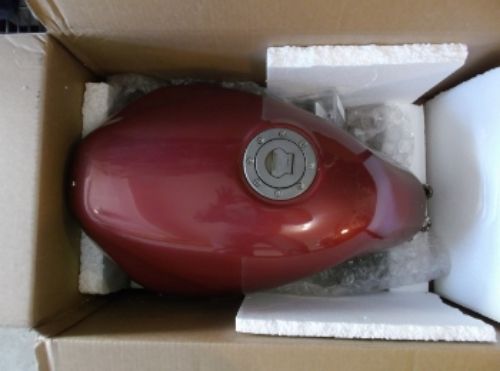


It has some light rust both inside and outside so I'm going to send it out to a shop that will do a complete recondition job on it, but before I could do that I needed to make a couple of little dremel cuts to open up the petcock orifice a bit. 
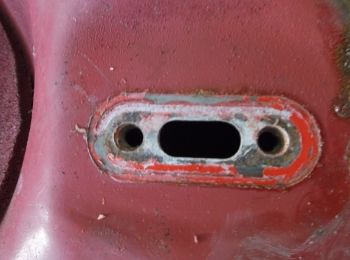


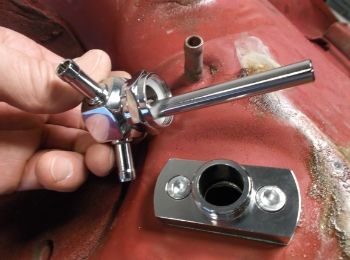
This will allow me to mount a Pingle Fuel Injection manifold in place of the bike's original petcock.  The fuel injection manifold has two tubes, an outflow and an inflow.  I plan to use a Honda TRX420 Rancher ATV external fuel pump and it needs to be able to return excess fuel to the fuel tank.
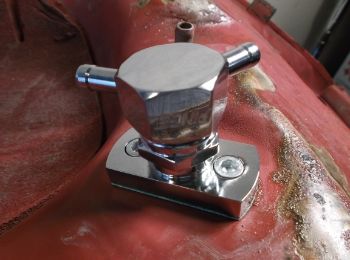
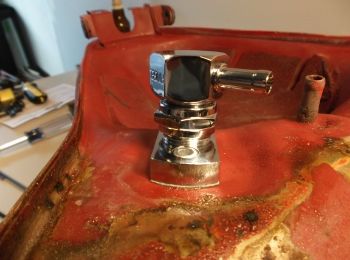


Now the tank is ready to be reconditioned and primed for painting, so it's all boxed up and ready to ship.
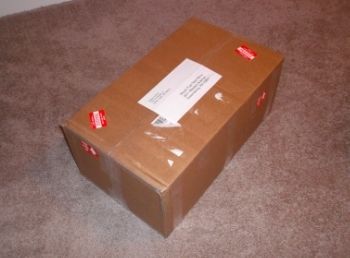


There it is, the first post of my GSF400FI Bandit project.

Offline TJS

  • Board Homesteader!
  • ***
  • Posts: 409
Re: Greg's Bandit 400 Fuel Injection Project...
« Reply #1 on: October 25, 2013, 11:54:28 AM »
A man and a plan! You stateside or across the pond?
More Bandit 400 stuff on my youtube:
https://youtube.com/c/StanleysGarage369

Offline greg737

  • Board Homesteader!
  • ***
  • Posts: 315
Re: Greg's Bandit 400 Fuel Injection Project...
« Reply #2 on: October 25, 2013, 12:33:06 PM »
A man and a plan! You stateside or across the pond?

I'm in the Pacific Northwest. 

Found my "new to me" Bandit 400 via a Craigslist add in Portland, OR.  According to the guy I bought it from the bike spent most of its life in the Seattle area where the damp, rainy winters would go a long way toward explaining the relatively low miles on the odometer (if true).

Offline andrewsw

  • Board Homesteader!
  • ***
  • Posts: 598
Re: Greg's Bandit 400 Fuel Injection Project...
« Reply #3 on: October 28, 2013, 12:32:53 PM »
I'm in the Pacific Northwest. 

Found my "new to me" Bandit 400 via a Craigslist add in Portland, OR.

Where exactly? I'm in Portland myself. PM me if you don't want to be public.

There is at least one other B4 in portland, I see it every once in a while, but always going the other way and I never get to stop the owner. It's flat black w/ red frame -- that's all the detail I've gathered from high-speed encounter ;)

A

Offline B4ndit

  • TURBO TYPER!
  • **
  • Posts: 38
Re: Greg's Bandit 400 Fuel Injection Project...
« Reply #4 on: October 28, 2013, 01:20:37 PM »
Nice.... Ill be following your build please keep us updated. I used a DR350 petcock it works fine just need to make sure I turn it off after running

Offline greg737

  • Board Homesteader!
  • ***
  • Posts: 315
Re: Greg's Bandit 400 Fuel Injection Project...
« Reply #5 on: October 28, 2013, 01:59:51 PM »
I'm in the Pacific Northwest. 

Found my "new to me" Bandit 400 via a Craigslist add in Portland, OR.
Where exactly? I'm in Portland myself. PM me if you don't want to be public.

Actually I'm in Spokane.  I bought the bike in the Kenton neighborhood on Portland's north side.  Had to ride it home to Spokane from there.  (So thanks to me there's now 1 less Bandit 400 in Portland)

Offline andrewsw

  • Board Homesteader!
  • ***
  • Posts: 598
Re: Greg's Bandit 400 Fuel Injection Project...
« Reply #6 on: October 28, 2013, 02:03:29 PM »
I'm in the Pacific Northwest. 

Found my "new to me" Bandit 400 via a Craigslist add in Portland, OR.
Where exactly? I'm in Portland myself. PM me if you don't want to be public.

Actually I'm in Spokane.  I bought the bike in the Kenton neighborhood on Portland's north side.  Had to ride it home to Spokane from there.  (So thanks to me there's now 1 less Bandit 400 in Portland)

gah! Thanks to me there's one less Bandit 400 in Spokane! (I move to PDX from there in 2010). Ah well, so it goes.

Offline blong

  • First Post! Be Gentle!
  • *
  • Posts: 1
Re: Greg's Bandit 400 Fuel Injection Project...
« Reply #7 on: October 29, 2013, 01:44:05 PM »
That's my old bike that Greg bought. Glad to hear that it made the trip back to Spokane. It's good to know that it went to a good home. Enjoy and good luck with your project! :bigok:

Offline greg737

  • Board Homesteader!
  • ***
  • Posts: 315
Re: Greg's Bandit 400 Fuel Injection Project...
« Reply #8 on: October 29, 2013, 03:48:42 PM »
That's my old bike that Greg bought. Glad to hear that it made the trip back to Spokane. It's good to know that it went to a good home. Enjoy and good luck with your project! :bigok:

Thanks Brandon.

Offline greg737

  • Board Homesteader!
  • ***
  • Posts: 315
Re: Greg's Bandit 400 Fuel Injection Project...
« Reply #9 on: November 03, 2013, 01:12:03 AM »
Today I began the process of relocating the battery and overflow bottle.  I need to use the space that they normally occupy for the fuel pump and the Microsquirt ECU.  The Honda TRX420 fuel pump needs a space about 4 inches wide by 8 inches high and that piece of space has to be below the level of the fuel tank's petcock.

So I took some measurements and determined that the battery holder (along with a slightly modified overflow bottle) can be mounted under a properly sized solo cowl.  The problem is that apparently nobody makes a solo cowl for the Bandit 400 any more.  And I don't know if any of the ones that were made would have had the open volume underneath that I need.  So I'm going to make one.

I will be using the Microsquirt to control ignition so I have removed the Ignition box from the solo cowl area.


I'm using the tougher, sand-able type of floral arrangement foam to make the "Plug" that will serve as the pattern for the fiberglass work that will form my solo cowl.


This is just one evening of work, there's a long way to go to produce a completed solo cowl...


« Last Edit: November 03, 2013, 02:14:31 AM by greg737 »

Offline greg737

  • Board Homesteader!
  • ***
  • Posts: 315
Re: Greg's Bandit 400 Fuel Injection Project...
« Reply #10 on: November 04, 2013, 12:37:52 AM »
Got back into the garage today.  More refinements to the solo cowl "plug", sanding and shaping and trying to make it symmetrical.


It's getting there.  I'm planning on changing the contour of the seat, it will be flatter at its rear with none of the original's "upslope" at the rear end.  Instead of the "upslope" there will be a small flat pad on the front end of the solo cowl.

I'm planning to use the "lost foam" method of fiberglass part construction.  When I get the plug to its final shape I'll spray it with several coats of Plasti Dip.  Then I'll wax it with mold release wax and then spray it with hairspray, both of these steps are to insure that the fiberglass piece does not stick to the plug.  When the fiberglassing is completed I will open up a hole in the Plasti Dip coating on the bottom of the plug and pour Acetone on it.  The Acetone will eat up all of the plug's styrofoam and the results will simply pour out.  Then I'll be able to just grab the edge of the Plasti Dip coating and pull it out like a deflated balloon.  This will leave me with a perfect fiberglass solo cowl.
« Last Edit: November 04, 2013, 12:53:18 AM by greg737 »

Offline andrewsw

  • Board Homesteader!
  • ***
  • Posts: 598
Re: Greg's Bandit 400 Fuel Injection Project...
« Reply #11 on: November 04, 2013, 11:00:29 AM »
 :thumb:

Looking great! I've wanted to do this for some time. My previous bandit had the factory cafe fairing and solo cowl and it was so pretty.

It's hard to tell from the pictures -- will the battery really fit in there?

A

Offline greg737

  • Board Homesteader!
  • ***
  • Posts: 315
Re: Greg's Bandit 400 Fuel Injection Project...
« Reply #12 on: November 04, 2013, 12:00:13 PM »
Yes, it will fit. 

Look back up at the first 2 pictures of my battery-relocation post (November 2).  The white string line that you see in the picture is the top of the solo cowl (The battery holder's original tall connection points will be cut off and welded back on at a much lower point).

I plan to cut out a battery holder sized hole in the floor in the fender so the battery holder can be mounted vertically.  This cut-out will give me about one inch (maybe one and a half inches) of further clearance.  The level of the bottom of the battery holder will be located between the frame rails where the rear tire cannot reach (the shock reaches its travel limiting "bump stop" before the tire reaches this point).

Offline interfuse

  • Site Supporters
  • Board Homesteader!
  • ***
  • Posts: 1336
Re: Greg's Bandit 400 Fuel Injection Project...
« Reply #13 on: November 04, 2013, 01:04:14 PM »
I know some of the cafe guys use smaller batteries which might save you some space if needed.

http://antigravitybatteries.com/small-case-batteries/
Mike

'91 GSF400
It's more fun to ride a slow bike fast than a fast bike slow.

Offline Unique

  • Board Homesteader!
  • ***
  • Posts: 133
    • unique/bandit400blog
Re: Greg's Bandit 400 Fuel Injection Project...
« Reply #14 on: November 12, 2013, 03:39:42 PM »

I'm planning to use the "lost foam" method of fiberglass part construction.  When I get the plug to its final shape I'll spray it with several coats of Plasti Dip.  Then I'll wax it with mold release wax and then spray it with hairspray, both of these steps are to insure that the fiberglass piece does not stick to the plug.  When the fiberglassing is completed I will open up a hole in the Plasti Dip coating on the bottom of the plug and pour Acetone on it.  The Acetone will eat up all of the plug's styrofoam and the results will simply pour out.  Then I'll be able to just grab the edge of the Plasti Dip coating and pull it out like a deflated balloon.  This will leave me with a perfect fiberglass solo cowl.

Great work so far.. I'll watch with interest'  I've come across--- "using the tougher, sand-able type of floral arrangement foam to make the "Plug"---before...But I've never heard of  "lost foam" or "Plasti Dip" or if I have I haven't seen the possibility, I just google them and understand little bit more.