Author Topic: Valve stem seal replacement in the bike: a how-to  (Read 10177 times)

Offline tomacGTi

  • Board Homesteader!
  • ***
  • Posts: 663
Valve stem seal replacement in the bike: a how-to
« on: December 02, 2007, 06:30:10 PM »
**This is a more technical than a cam install and if you can't grasp that concept, have a shop do this for you.**

So many of you have been following the continuing saga that is my version of Jay's exhaust cam mod.

The truncated version is that it works great in my new-to-me motor but the new-to-me motor was a smoker. Thinking it may be rings, I decided to start taking apart my old motor to have the slugs ready to accept new rings and to get the cylinder ready to hone. Also, I would have to replace the stem seals as well seeing that there is no reason to not do it since everything else was coming apart.

Here's the rub:

-Rings: $29 x 4: $120

-Gasket set: Ebay is the cheapest at $130 and includes everything for the block and top end (including valve stem seals)

-Case gaskets: (the set doesn't come with these) $15 starter $8 clutch

This also doesn't include machining costs for checking the cylinder head and a valve spring compressor tool that works off the bike.

Now mind you, I'm already into this for $300 or so for the motor and I'm tired of hemmoraging money so I decided after examining the pistons from my other motor, that more than likely the rings sealed fine and it may just be the stem seals that need to be replaced. Signs were: Smokes at idle, leaving from a light, slight blueish-whiteish trail at part throttle. Basically at the highest vacuum moments, bad seals allow oil to seep down the stems into the combustion chamber: smoke.

Here's where it gets interesting: even the valve stem seals are expensive: $54 from Bike Bandit for 16 OEM seals. Coming from a car background, that is ridiculous. I usually spend less than $20 for 16 stem seals for my VW. Searching around only yielded slightly better prices but the least expensive place to get them was APE race parts. These are for a Honda 929 but they size out exactly the same: 4.5mm stem, 10mm deep x 8mm Dia (for the valve guide). $36 later and $10 shipping I was on my way. P/N is 99210.

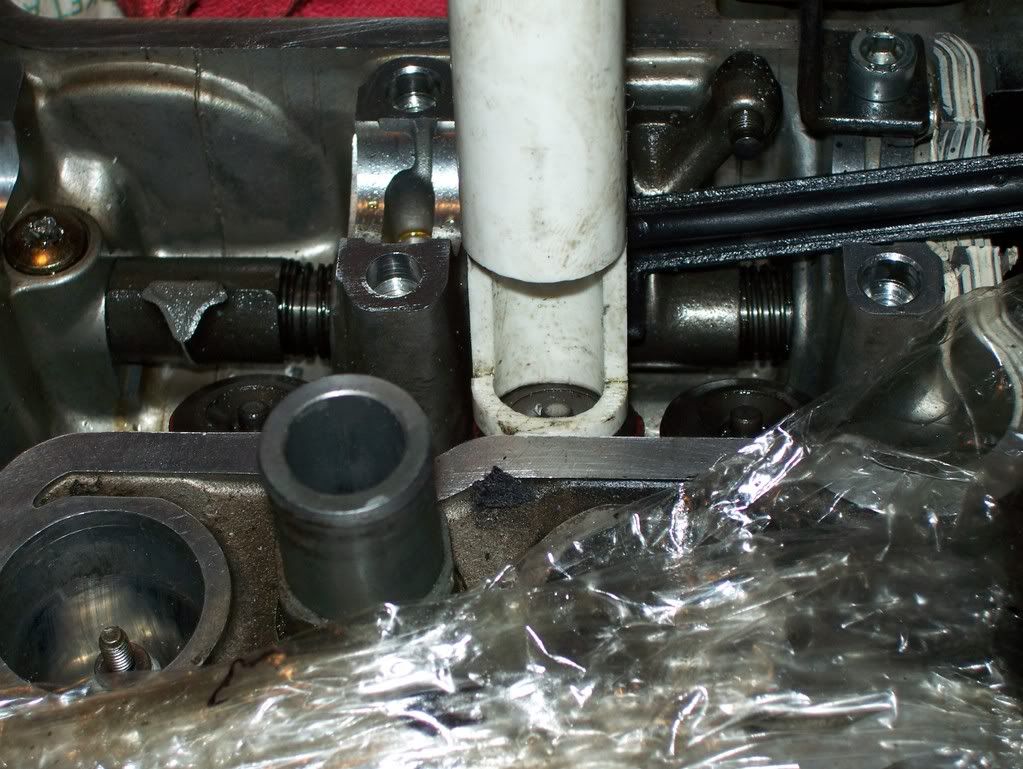
Now, everyone I asked has told me that it is necessary to remove the cylinder head in order to do the stem seals. This is only partially true. Once again, coming from a car background, it isn't uncommon to do them while still bolted up on the block and in the vehicle but you do need a tool that will allow you to compress the valve springs in order to get to the stem seals themselves. This tool bolts to the cylinder head once the cams are removed.


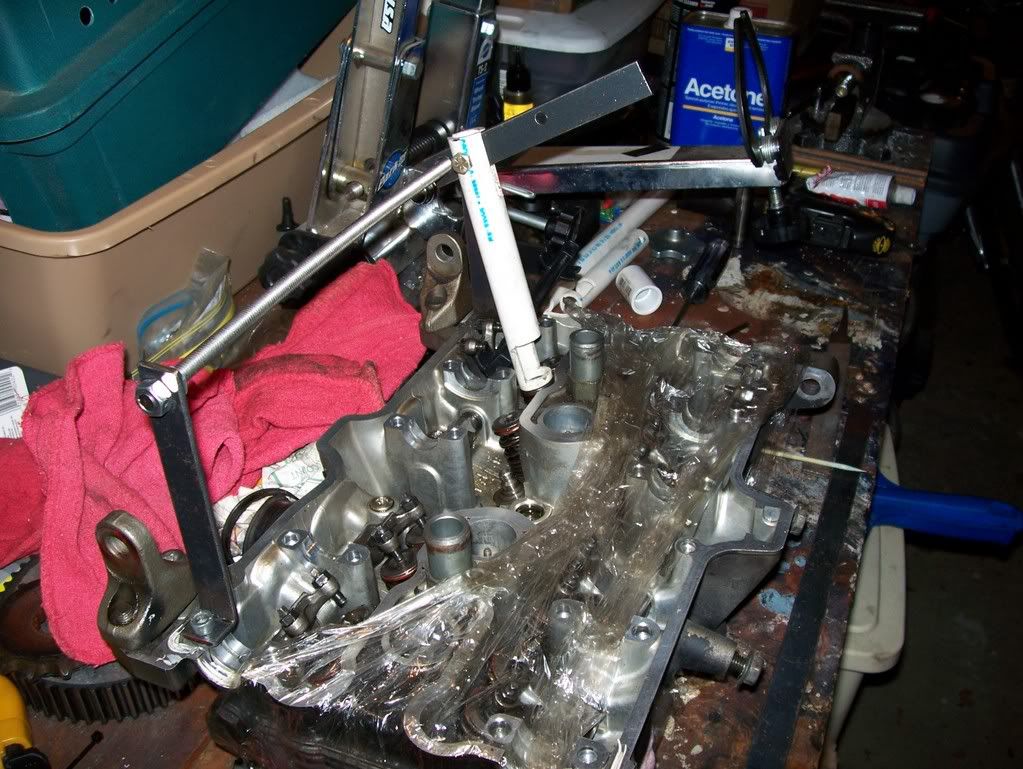
The tool is basically two towers made up of 1/2" wide, 3/16th thick steel plate using a 16" piece of stainless steel 5/16th allthread. The piece used to compress the valve spring is made of 6 1/4" of 1/2" PVC with a notch cut out of it to access the keepers. I also used a bicycle fork packing piece to support the press against the rocker so that the pipe would not creep (since the entire valvetrain sits at a 15* angle or so). You can use anything you like, I had this and it worked fine for me.


It bolts to the head via the cam towers on the far sides using some metric hardware (6x1 IIRC). The towers stand at 5 inches high and have 6mm holes drilled into the bases for the mounting bolts. The lever itself used to be longer but I had to cut it down to 5.5" in order to have enough space to work with on the bike for both the exhaust and intake side. The tool is in position to do the exhaust valves in this picture, obviously it would need to be re-oriented to do the intakes.


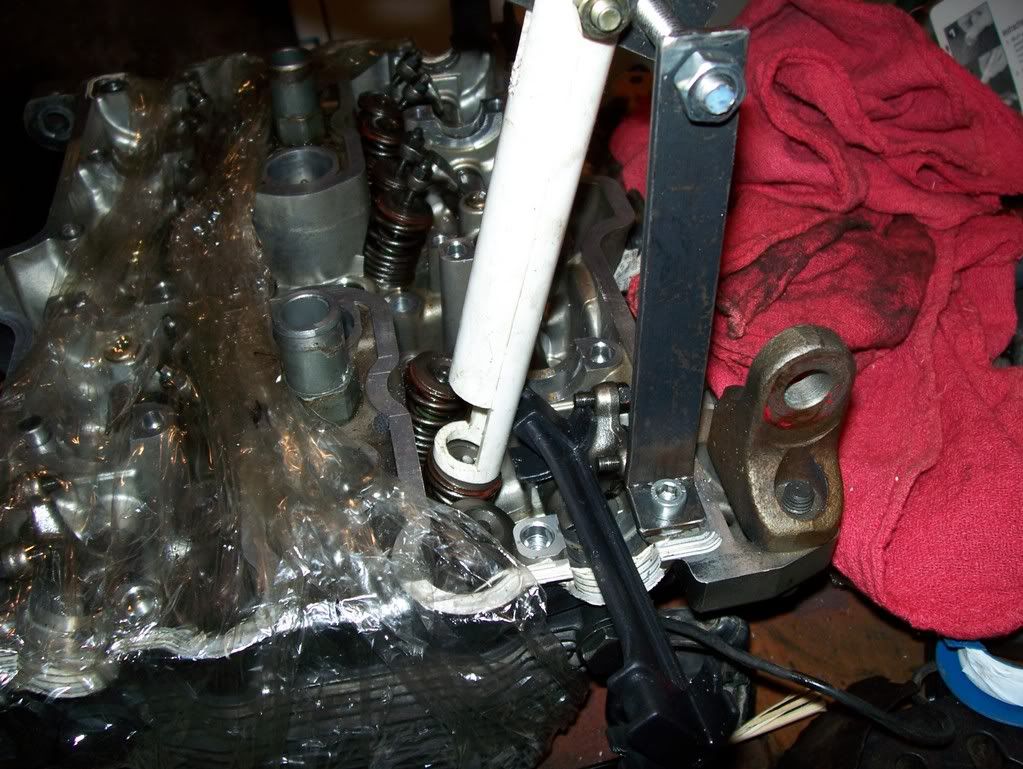
Now obviously these pictures were taken on my messy workbench in the basement but this contraption does fit in the confines of the Bandit frame on the bike. Usually when you do this on a car, you fill the cylinders via the spark plug hole with air so that the valve won't drop in. The more old school way to do it was to fill the cylinders with rope or string to cushion the valve. I just worked on the cylinders in pairs at TDC since 1-4 and 2-3 are paired and gently rested the valves on the cylinder tops. If you've never seen them, the pistons are cast in the same angle that the valves are positioned in the cylinder head (hemispheically) so that the entire valve face is supported, not just an edge which could cause it to bend otherwise.

This is a very tedius job and not for the faint of heart. The keepers that hold the valves into the retainers are little chips of metal barely 2mm around (paired). If you don't properly support the tool as well as place some rags or a sponge down at the cavity of the cam chain, you may never find them again. Removing them sometimes takes a gentle rap with a wrench on the compressor to free them from the retainer and if the tool slips (reason for the support peice in pic 3) they will shoot to the neitherregions of everywhere. You'll need a magnetic pick-up tool (a small one) to remove them from the valve stem and a pair of long reach needlenose to remove the seal from the valve guide. The old seals may be cracked and brittle and will not want to come off but be careful that you don't scratch the valve stem in the process. Be sure to oil the new seals prior to installation, they should push right on and snap into place on the valve guide (has a shoulder for them). Also, make sure you only work on the cylinders that are at TDC. If you don't, you'll drop a valve and have to pull everything apart.

Total time from start to finish was 4 hours or so, a total surgery. Other tools you'll need are a non-magnetic poker of some sort (I used a bamboo barbecue skewer) to coerce the keepers back onto the valve stem (the hardest part). Make sure to also replace the springs onto their proper spots and orientation. I found it easier to work with the pair of valves at the same time just to allow more room for extraction of the seal.

Results: no more smoking. All of the seals on the exhaust side of my low-mileage motor were dry rotted and cracked probably due to the heat and tight valves. The intake side was much better. The irony is that my old motor's seals were all fine at 25k, the new-to-me motor had 7k. Go figure.

Best of luck and most importantly TAKE YOUR TIME.

-Randy

Offline PitterB4

  • Administrator
  • Board Homesteader!
  • *****
  • Posts: 3698
Re: Valve stem seal replacement in the bike: a how-to
« Reply #1 on: December 02, 2007, 08:32:38 PM »
Great write-up, Randy.  Thanks, man.  Glad it all went well for you.  It's interesting that the lower-mileage motor's seals were in worse shape.  I wonder if the motor sat idle for an extended period of time.
Rob
Bikeless!
'93 Bandit 400 - SOLD
'98 Honda F3 Track Bike - SOLD
'98 Kawi ZX-6R Street Bike - SOLD
NESBA #87 - RETIRED
'00 Gary Fisher Kaitai
'09 Bianchi Via Nirone 7

Offline tomacGTi

  • Board Homesteader!
  • ***
  • Posts: 663
Re: Valve stem seal replacement in the bike: a how-to
« Reply #2 on: December 02, 2007, 09:39:57 PM »
The motor defineately sat for awhile somewhere before it made it's way to me.

You should see the carbs Rob, the throttle butterfly is rusted into place so the exhaust stem seals are no surprise. I haven't even attempted to take the carbs apart yet to see how much worse it is.

Offline Red01

  • Board Homesteader!
  • ***
  • Posts: 8977
  • Are we having fun yet?
Re: Valve stem seal replacement in the bike: a how-to
« Reply #3 on: December 03, 2007, 02:39:49 PM »
 :clap: Nice job!  Do you mind if we move this to the FAQs?

My guess is the low mile motor sat too long, making the top end suffer from dry rot since fresh oil wasn't pumped up to the head very often.
Paul
2001 GSF1200S
(04/2001-03/2012)
2010 Concours 14ABS
(07/2010-current)


Offline PitterB4

  • Administrator
  • Board Homesteader!
  • *****
  • Posts: 3698
Re: Valve stem seal replacement in the bike: a how-to
« Reply #4 on: December 03, 2007, 04:16:07 PM »
Yeah Paul.  I was going to leave it here for a while to let it be admired  :grin: and then move it over.  Of course I often think of that and then never remember to move it later.   :duh:
Rob
Bikeless!
'93 Bandit 400 - SOLD
'98 Honda F3 Track Bike - SOLD
'98 Kawi ZX-6R Street Bike - SOLD
NESBA #87 - RETIRED
'00 Gary Fisher Kaitai
'09 Bianchi Via Nirone 7

Offline gsxr400 racer

  • I find things for a small fee....
  • Site Supporters
  • Board Homesteader!
  • ***
  • Posts: 3344
    • For all your disc golf needs...maybe i can race again someday.lol
Re: Valve stem seal replacement in the bike: a how-to
« Reply #5 on: December 03, 2007, 06:50:27 PM »
pretty crafty mate so you think it will fit in on while the motor is in? I smell a patent is it does or at least a couple of sales.
cheers
 :beers:
1988 gsxr 400 sp (sprint bike)
*  SELLER OF THE 442CC BIG BORE PISTON KIT FOR THE BANDIT 400,GSXR400, GK73 and 76.* And carb kits(orings)too. Email me from here.
has been a wera expert #610 lol

Offline tomacGTi

  • Board Homesteader!
  • ***
  • Posts: 663
Re: Valve stem seal replacement in the bike: a how-to
« Reply #6 on: December 03, 2007, 08:48:10 PM »
Did it all in the bike on Thanksgiving since the weather was nice. I don't have a garage so I have to take advantage of the nice days when I can. Sadly, it looks like I'm going to have to mothball the bike this week sometime as snow is in the forecast.

Everything fits in the frame just nice and dandy, the initial test run was on a workbench with some measurements from the frame. My hands were too oily to get a set of pics during the process so hence the later, in the basement pics. That and I wanted to make sure it would work.

I was half-thinking that the seals dried up from sitting, it isn't unusual but doesn't explain why the intake side was OK. Who knows, I'm not questioning it now since it runs and doesn't smoke. I wish Coopz still had his Bandit that was a smoker though because I'm sure this was his problem as well.

Jay, I'd patent it but what good would it do for a three-year production bike? At least I know that someone else can do the job as well if they need to.

-Randy


Offline PitterB4

  • Administrator
  • Board Homesteader!
  • *****
  • Posts: 3698
Re: Valve stem seal replacement in the bike: a how-to
« Reply #7 on: December 03, 2007, 09:13:06 PM »
Sadly, it looks like I'm going to have to mothball the bike this week sometime as snow is in the forecast.

Dude - look outside... it's snowing now! 
Rob
Bikeless!
'93 Bandit 400 - SOLD
'98 Honda F3 Track Bike - SOLD
'98 Kawi ZX-6R Street Bike - SOLD
NESBA #87 - RETIRED
'00 Gary Fisher Kaitai
'09 Bianchi Via Nirone 7

Offline Red01

  • Board Homesteader!
  • ***
  • Posts: 8977
  • Are we having fun yet?
Re: Valve stem seal replacement in the bike: a how-to
« Reply #8 on: December 03, 2007, 10:40:05 PM »
Jay, I'd patent it but what good would it do for a three-year production bike? At least I know that someone else can do the job as well if they need to.

-Randy

3 years in the US.  11 years worldwide.
Paul
2001 GSF1200S
(04/2001-03/2012)
2010 Concours 14ABS
(07/2010-current)


Offline gsxr400 racer

  • I find things for a small fee....
  • Site Supporters
  • Board Homesteader!
  • ***
  • Posts: 3344
    • For all your disc golf needs...maybe i can race again someday.lol
Re: Valve stem seal replacement in the bike: a how-to
« Reply #9 on: December 03, 2007, 10:51:28 PM »
did you have to put string in the spark plug hole like you where saying? Did the valve drop down at all when you removed the old valve seal? Did you feel confident in the seal seating on the guide properly while the valve was still in the guide?
1988 gsxr 400 sp (sprint bike)
*  SELLER OF THE 442CC BIG BORE PISTON KIT FOR THE BANDIT 400,GSXR400, GK73 and 76.* And carb kits(orings)too. Email me from here.
has been a wera expert #610 lol

Offline tomacGTi

  • Board Homesteader!
  • ***
  • Posts: 663
Re: Valve stem seal replacement in the bike: a how-to
« Reply #10 on: December 03, 2007, 11:23:14 PM »
Quote
did you have to put string in the spark plug hole like you where saying?

Nope, dropped them right onto the piston.
Quote
Did the valve drop down at all when you removed the old valve seal?

About 2mm, fell right on top of the piston.
Quote
Did you feel confident in the seal seating on the guide properly while the valve was still in the guide?

Absolutely, didn't leak. Enough for me.


Edited to correct formatting
« Last Edit: December 04, 2007, 03:10:10 PM by Red01 »

Offline kako

  • Site Testing Volunteer
  • Board Homesteader!
  • ***
  • Posts: 108
Re: Valve stem seal replacement in the bike: a how-to
« Reply #11 on: December 07, 2007, 04:09:46 PM »
i spy a park tools truing stand...mmmm i wish i had one... would make my life sooo much easier. and safer because of the guard... i have seen how fast spokes can shoot out of a wheel.. and it would hurt.
Kev
GSXR 400

Offline tomacGTi

  • Board Homesteader!
  • ***
  • Posts: 663
Re: Valve stem seal replacement in the bike: a how-to
« Reply #12 on: December 09, 2007, 04:11:46 PM »
Damn man, how are you building wheels? (j/k)

My GF and I are team mechanics for a pro road team, we've been bicycle mechanics for longer than I can remember. Funny the tools that you acquire in time.

-Randy

Offline VW_NUT

  • Board Homesteader!
  • ***
  • Posts: 86
Re: Valve stem seal replacement in the bike: a how-to
« Reply #13 on: December 11, 2007, 10:33:08 AM »
Nice write up. 
« Last Edit: December 11, 2007, 10:57:41 AM by VW_NUT »

Offline kako

  • Site Testing Volunteer
  • Board Homesteader!
  • ***
  • Posts: 108
Re: Valve stem seal replacement in the bike: a how-to
« Reply #14 on: December 11, 2007, 01:54:44 PM »
... well since you asked... the last couple have been on a old cut up frame, because to don't have access to a truing stand anymore.... lets just say they were interesting to do...
Kev
GSXR 400