Author Topic: Poor mans sync results(Awsome tips update)  (Read 5360 times)

Offline rider123

  • Board Homesteader!
  • ***
  • Posts: 991
Poor mans sync results(Awsome tips update)
« on: February 09, 2012, 07:08:30 PM »
Hey guys,

I'd just like to share with you my experiences with this little number(this is actually built better than mine, if you didn't think it could get more ghetto, Your wrong!)  :grin:


I figured what the hell I'll put it to the test as I knew my carbs were out from many jetting tests, sessions, etc. The basic premise is this, you have a tube that I filled with motor oil as it has a higher viscosity and if accidentally sucked into the engine it won't do any damage. At first I was going to use coloured  water but I didn't want to risk a bent rod or anything due to hydrolock. Some guys will tell you to use transmission oil as it has an even higher viscosity but I think that is way too much as the oil moved slowly enough and was stabil enough that any thicker it would lose alot of accuracy. Also motor oil is readily available and everyone has some kicking around.

Now with this system it's basically a tug of war so the levels don't have to be even but they have to be pulling the same amount. I was only able to do 3 and 4 because it was so damn cold and I needed some bent needlenose for the vacuum caps which I didn't have for 1 and 2. However I figured I would do 2 cylinders and if it screwed up it wouldn't be too crazy to fix with paying someone $100 to do it right. So anyway I hooked up the tubes to 3 and 4 and started her up. Right away number 4 started pulling the oil up that side slowly so obviously I was out after adjusting them so that they were not even but one wasn't pulling up faster than the other. I gave it some slight throttle to make sure as the oil has a very high viscosity so you need to increase the vacuum to make sure it's really on. After increasing the throttle slightly I noticed now number 3 pulled slightly more, ok a little more adjusting and now they both pull the same properly fine with no problems. So with a shitload of jackets on I took it for a ride as I said I could only do 2 of the cylinders. Well with only 2 of the cylinders in sync I felt quite a difference in the smoothness and the throttle response.

With number 4 pulling more, number 3 was dragging so you'll get more power. I did notice a slight rise in the idle as the cylinders don't have to drag a lazy cylinder around so I adjusted the idle back down and noticed it was smoother. I can't wait until the spring so I can do it properly. Since I only did half I did notice it had a slight off sync(still smoother though) as I have to do cylinders 1 and 2 then match them with 3 and 4 but for a half assed carb sync it worked great. I had sort of a miss that is completely gone now probably due to the fact that number 3 wasn't pulling it's weight and alot more throttle response and power.

I think this carb sync is actually superior to the ones that you buy for $100 and here's why. With a differential pressure system the carbs are either pulling the same or they are not, there is no inaccuracy with the guages. Also the guage method the cylinders are completely isolated so there is no differential pressure to compare to. It just says "X" on a dial and you make the other cylinders say "X" and hope it comes out ok. With this system the cylinders are playing a tug of war with each other so even if you are minutely off it's going to show up right away, there is no guage to be inaccurate with, it's just physics. Either its in sync or it's not, not "close" on a dial or slider.

I know some guys like to have 4 of them together with T connectors connecting them all but I think that it may actually be more difficult and less accurate than doing the cylinders 2 at a time then syncing 1 and 2 to 3 and 4. The reason is this, if all the cylinders are connected, now you have 4 carbs playing a tug of war with the oil in the tubes, so say you are trying to get 3 and 4 the same, suddenly it looks like 1 and 2 are now out when they may not be, the fluid has pull from somewhere so it may look like 1 and 2 are losing vacuum where you are adjusting 3 and 4 but really it's just stealing fluid from that area of the tube to compensate for any vacuum changes.

The best way is to do them in pairs then once the pairs are totally in sync. Connect either 1 or 2 to number 3 carb which is the root carb where the throttle cable pulls from and you should be good to go. This will sync pairs 1 and 2 to 3 and 4.

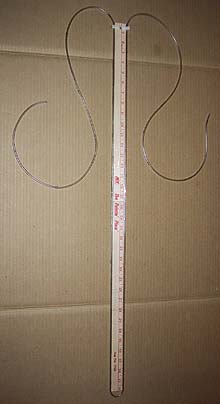
Poor mans sync tool:

Found a dead yard stick: free
Had some duct tape: free
20 Feet of clear tubing: $5
Empty 2 litre coke bottle for axillary tank: free

« Last Edit: March 14, 2012, 08:28:48 PM by rider123 »
2005 Bandit 1200, Modified Holeshot Stage 1 with 17.5 pilots 2.75 turns out, and 110 mains 5 shims. Muzzy Slip on w/mid-pipe, stock filter. 1.5" hole in the airbox lid.

Offline mwheat308

  • Site Supporters
  • Board Homesteader!
  • ***
  • Posts: 74
Re: Poor mans sync results(well half anyway)
« Reply #1 on: February 09, 2012, 08:38:45 PM »
Thanks for the info.
I'll try that later when the temps are closer to 80 F, (I'm old and cold).

Mike
Gun CONTROL is hitting the target the FIRST time!

Offline rider123

  • Board Homesteader!
  • ***
  • Posts: 991
Re: Poor mans sync results(well half anyway)
« Reply #2 on: February 09, 2012, 09:04:32 PM »
I envy you guys in Texas, I did it in 40F, and yes it was cold! Opps I forgot to say make sure the bike is totally warmed up by driving it for at least 20 mins or so(that didn't help my coldness any)and then adjust. Because this way is so accurate and the motor oil is highly viscous you can adjust the pairs in no time. In fact the hardest part was taking those damn vacuum nipples off. I'll build some extenders in the spring when I can feel my hands. The one benefit of it being cold is the bike didn't mind a bit just sitting there idling. I imagine in 100F you may want to give the engine a break every 10 mins if it's taking that long. I don't know it only took me maybe 5 mins max adjusting and the rest of the time taking the tank off and those hellishly placed vacuum nipples off.

Oh yeah I also built an auxiliary tank out of maybe 10 inches of the vinyl tube and a 2 litre coke bottle. I poked a hole in the cap and fed the tubing through and sealed it with duct tape. I just laid it where the document tray was and poked a hole in the top so the fuel would flow and just feed the carbs every min or so by tilting the 2 litre bottle up and into the fuel line as the vinyl tubing fit perfectly inside the fuel line. All you need is maybe a quarter litre or so in the coke bottle.

It really makes a difference when there isn't any cylinders not pulling their weight. I could even feel it through the 2000% worse aerodynamics I had with so many jackets on. I think if I had any more I would have been able to take off into the air!  :grin:
« Last Edit: February 09, 2012, 09:46:42 PM by rider123 »
2005 Bandit 1200, Modified Holeshot Stage 1 with 17.5 pilots 2.75 turns out, and 110 mains 5 shims. Muzzy Slip on w/mid-pipe, stock filter. 1.5" hole in the airbox lid.

Offline mwheat308

  • Site Supporters
  • Board Homesteader!
  • ***
  • Posts: 74
Re: Poor mans sync results(well half anyway)
« Reply #3 on: February 09, 2012, 09:58:28 PM »
Yeah, I always warm the engine and in my previous position I used manometers a lot.
Thanks for the tip on the 2 liter bottle.
Last summer it was 112F several times and sitting in traffic was a bit warm, I'm very close to Dallas/Ft Worth.
Thanks Again

Mike
Gun CONTROL is hitting the target the FIRST time!

Offline rider123

  • Board Homesteader!
  • ***
  • Posts: 991
Re: Poor mans sync results(well half anyway)
« Reply #4 on: February 09, 2012, 10:13:33 PM »
Sometimes the simplest fixes are the best. Since this is using physics not some sort of a dial or slider that can be out you can't really go wrong as long as those carbs pull the same. I think the thing that trip up people is they think the levels have to be the same. They just have not to be moving on one side or the other and pull up the same amount when light throttle is applied. However if it makes you feel better you can adjust them until they are both the same level, then make sure they pull the same when light throttle is applied. Since the oil is pretty viscous you may after getting them close put some pressure on the throttle up to say 2000 rpm then release just to make sure they are pulling up the same, as the oil when at idle and close, but not perfect, will be moving so slowly you might not be able to see which has the slightly higher vacuum. With the rpm slightly higher it will exaggerate any mal adjustment.

If you wanted to experiment maybe try something lighter such as 2-stroke oil or something, just be ready with the kill switch in case the carbs are really out of alignment as it will get sucked into the engine. Thats why I used motor oil which is thicker. Theoretically you could course adjust with the motor oil then use another setup with the lighter 2-stoke oil to fine tune it but that would raise the price to a mind numbing $10!!! Who can afford such luxury?

 You can quickly test which way you need to go by putting some pressure, but not screwing in the adjustment screw. If one side goes down then you know when you tighten the screw that is where the adjustment will go, loosing the opposite, etc.

EDIT: I kept the tag from RONA for the tubing:

Outside Diameter: 5/16"
Inside Diameter: 3/16"
Length: 20 ft, only length they sold it in(a little long but can be used for auxilary tank, etc)

But I'm sure if your close enough it will work all it needs to do is be small enough to seal on the vacuum nipples and enough to make a tilting Axillary tank. It doesn't need alot as it's just sort of idling there with minor amounts of throttle so a super high flow for the axillary tank is not necessary. Just remember Number 4 carb has a slightly larger nipple for the vacuum hose so use that as a baseline. At least on my 2005 Bandit 1200. I think it's alot easier on the 1 GEN Bandit as the vacuum nipples are at least situated properly on top of the carbs.

In the spring I'll make a coupler out of a few inches of tubing and a plastic coupler with a cap on the end but that would increase the price to an unimaginable $8. What does Suzuki think we're made out of money?
« Last Edit: February 10, 2012, 05:29:28 AM by rider123 »
2005 Bandit 1200, Modified Holeshot Stage 1 with 17.5 pilots 2.75 turns out, and 110 mains 5 shims. Muzzy Slip on w/mid-pipe, stock filter. 1.5" hole in the airbox lid.

Offline rider123

  • Board Homesteader!
  • ***
  • Posts: 991
Re: Poor mans sync results(well half anyway)
« Reply #5 on: February 10, 2012, 05:38:48 AM »
If you have all that extra tubing you can also check the float levels without taking the carbs off the bike. What you do is attach some of the hose on the drain nipples and curve the hoses so that they are above the level of the float bowls. When the drains are opened the fuel will fill up to the level dictated by the float height. With them all hooked up you can compare how the fuel heights look. I did this as I was testing the float height on number 1 without measuring it. I was able to get the float height back in line with the other carbs by using this method. When you open the drain screw there may be some air bubbles, just start the bike and they'll go away when the fuel is sucked into the floatbowls. Here is a video of it because my explanation may be lacking, but it does work. As long as they are within a mm of each other you should be good to go this guy seemed to like it so much he permanently attached it to the side of his carbs with a twist tie but I just did it temporarily with some tape from number 1 which was in question and number 4 which I knew was dead on at 13mm. This way you just need to take the float bowl off to adjust not the entire bank of carbs if you think one is out as long as it's an outside carb. Or at least compare them to see where they are.

Video:

http://www.youtube.com/watch?v=OG1Qiki7hH8

If you have within what he has in the video that should be perfectly fine, there will always be a little difference but if you want to spend 20 hours making it perfect hey what the hell.
« Last Edit: February 10, 2012, 06:12:43 AM by rider123 »
2005 Bandit 1200, Modified Holeshot Stage 1 with 17.5 pilots 2.75 turns out, and 110 mains 5 shims. Muzzy Slip on w/mid-pipe, stock filter. 1.5" hole in the airbox lid.

Offline rider123

  • Board Homesteader!
  • ***
  • Posts: 991
Re: Poor mans sync results(well half anyway)
« Reply #6 on: March 11, 2012, 07:07:13 PM »
Just a little update from a response to another thread:

"Yeah no problem! I just finished up today with a poor man sync and my bike is running awesome now that I got rid of those 17.5 pilots and went up to 112.5 mains. It's almost uncontrollable. I'm afraid to go past half throttle under 3rd gear it keeps lifting up. Very Happy I just did a poor man's sync today as it was 15C out today but I couldn't get that damn number 2 vacuum nipple, I've built extenders for carbs 1 and 3 and have one for 2 but I can't get in there without taking the damn carbs off. I'm going to go to my friends bike shop next weekend so we can get some real tools in there and see if it can't be done. I'm not sure WTF Suzuki was thinking. I guess the drunk guy at the factory was like "Oh yeah bike owners love to take the entire bike apart to do a simple carb sync!" I almost wished they stuck with the RF900 carbs the gen 1 uses with the vacuum nipples nicely situated on top of the carbs so you can actually reach them. As it stands now 3 and 4 are spot on and number 1 is synced with 3 and 4 so it's close but I can tell that number 2 needs some lovin' as I can artificially make it idle slightly smoother by turning the mixture screw in to starve it a bit of fuel so I can tell it's running slightly hotter than number 1. Still pretty good though. I wish I thought of the extenders when I had the carbs off, I guess I was thinking more about jetting then convenience at the time."

That 5$ sure did a whole lot of good! Works great. Now if I can only get number 2 synced I will be fine as its still off.
« Last Edit: March 14, 2012, 05:36:41 PM by rider123 »
2005 Bandit 1200, Modified Holeshot Stage 1 with 17.5 pilots 2.75 turns out, and 110 mains 5 shims. Muzzy Slip on w/mid-pipe, stock filter. 1.5" hole in the airbox lid.

Offline rider123

  • Board Homesteader!
  • ***
  • Posts: 991
Re: Poor mans sync results(Awsome tips update, a must read)
« Reply #7 on: March 14, 2012, 08:59:53 PM »
Ok after a great deal of pain and suffering I finally got the extender on carb number 2 finally. It's now super easy to sync the bike up and I want to share a little tip with you guys which really helps out the smoothness alot. Since this guage is so accurate you can also fine tune your mixture screws as well. As we all know there will be microscopic machining differences, slide spring tension blah blah blah. Needless to say every cylinder will be just slightly different than the next. What you should do before the sync is go for a low throttle cruise around town, no full throttle 1/4 mile burnouts, etc ,etc just a nice leisurely cruise under 1/8th throttle to make sure the plugs are being coloured mostly with the cruise or pilot mixtures. This way when you take a look at them, you'll notice that some of them might be a little richer or leaner than others. Make a note. For instance my number 2 cylinder is a little richer than all the others which are very close to one another.

When you're syncing the pairs and have them pull nicely together at idle put a little pressure on the throttle and bring up the rpm a few hundred rpm, say to 1500 or 1600 or so an look at which cylinder is pulling more now. So you look at the super expensive top of the line guage you made and realize. "Hey when I give it a little throttle, number 2 pulls more, then they are the same when I release the throttle WTF!!!!!!". The reason for this is as the rpms come up slightly the mixture will lean out a bit, the cylinder which is slightly richer won't lean out as much and have slightly more power than the one that is leaner. So you have 2 options:

1. You can richen up the leaner cylinder to match the richer one
2. Lean out the richer one to match the leaner one

What your trying to do is pick the best out of the pair. Since my number 2 cylinder had a bit of soot on the base ring and my number 1 cylinder plug looked perfect I leaned out the richer one so that when light(I'm talking just pressure)throttle was applied, they were now pulling up together in sync. Just be careful of the mixture screws, especially with the accuracy of the guage, doesn't need much turning at all I think I turned like less than 1/8th of a turn more like 1/12th or some other fraction I can't calculate. A good way to test if all the pistons are pulling the same is to move along in first gear just above idle at like 1500 or something insane. A slight downhill may help here, you can actually at this low speed feel the pistons power pulses. If there is a slight push every once and a while and it's not smooth than chances are the cylinders are pushing at different power rates, governed by the mixture screws at that level. In my case I had a cylinder rich, but if you had a cylinder that was lean it would still do it, though maybe not as noticeable(check the plugs). In this way you can get a hyper accurate sync probably way better than any bouncy ass dial. Remember this is only for the slow speed/less than 1/8th of a throttle sync, which is where you're going to feel smoothness or roughness. At higher rpm/throttle, it doesn't matter as much although I would wager that having all the cylinders mixtures super close together is going to make the bike at ALL rpms ranges smoother.
« Last Edit: March 14, 2012, 09:02:08 PM by rider123 »
2005 Bandit 1200, Modified Holeshot Stage 1 with 17.5 pilots 2.75 turns out, and 110 mains 5 shims. Muzzy Slip on w/mid-pipe, stock filter. 1.5" hole in the airbox lid.